Showing posts with label python. Show all posts

Saturday, September 10, 2022

Visualizing a Spotify Playlist - Simple Python Flask Web App Container Running Locally or in Azure


Update: February 2026 - after the Spotify changes discussed here, everything broke. So this post is now just for reference. We used to have the code deployed to an Azure App Service but that is no longer the case. With some minor tweaks this code can be made to work.


Azure App Service Deployment Screen pulling Image from Docker Hub Example of Playlist Viewer - Playlist ID 37i9dQZF1DXcxvFzl58uP7


Overview


This post is about visualizing Spotify playlists. Playlists are an important way of keeping track of music you like. Getting an overview (visually or list of tracks) is often useful. In this post, we visualize/summarize Spotify playlists by creating a simple Python web app (using Flask) and hosting a container with that web app either locally or in Azure. You can try it below.

The GitHub repo with the code to do this is at https://github.com/travelmarx/spotifyplaylistpython. You can run the code as is locally in a virtual environment or by deploying to App Service as code or a Docker container. We focus n containerizing the Python web app and hosting the container either locally or in Azure in this post. With minor modifications, you can host the container in other cloud services.

Show me how it works


To visualize a Spotify playlist, you first need to get its ID. Here are instructions how to get a Spotify Playlist ID. Briefly, go to https://open.spotify.com/ and optionally sign in if you have an account. Then, search for a playlist and select it. In your browser's URL find the ID and insert it below. The visualization is limited to up to 100 tracks in a playlist, but that can be relaxed. The playlist TM Spring 2025 - Unknownia is provided for you to start with.

There used to be buttons here to query the App Service but they were removed because the code no longer worked after Feb 2026 Spotify changes. Sorry! See update above.  Here's what was here:


Code


The GitHub repo travelmarx/spotifyplaylistpython has the most complete information about the code discussed here, including different scenarios you might want to run the code. For example, you can get the code from the repo and


  • Run it locally.
  • Host the code in Azure (or other cloud services).
We'll discuss now the deployment scenario of building and running a container locally. You'll need the following:
(If this is too much, see the repo README.md for using just a virtual environment with no containers.)

Step 1: Get the code.

git clone <this-repo-name>
cd <this-repo-name>

You can fork the repo to your own GitHub account and clone that repo. Or, you can just download the code directly as a zip.

Step 2: Build the image.

You can use the VS Code command palette, the VS Code Docker extension UI, or use Docker commands directly to work with images and containers. Here, we'll show Docker commands assuming you are not using VS Code. Start in the root of the project directory and run this in a Bash shell:


docker build --pull \
  --file "./Dockerfile" \
  --tag "spotifyplaylistpython:latest" . 

Notes:

  • Note the dot (".") at the end of the command.
  • Use the --no-cache option to force rebuild. (Not shown above.)
  • Note that the name of the image comes from the --tag option. When building in VS Code from UI, the name used is the project name lower-cased and with no hyphens.
  • Change the line continuation characters if you use a shell other than Bash.
After this command runs, you should have a new image in the IMAGES part of the Docker extension.

List images:

docker images

Step 3: Run the container image.

First, create an .env file with the following:

SPOTIPY_CLIENT_ID=<spotify-client-id>
SPOTIPY_CLIENT_SECRET=<spotify-client-secret>
DEFAULT_PLAYLIST=5HyEKEpzQU6MxxqeaDIHH3
FLASK_ENV=development
FLASK_APP=app.py

Now, run the image locally using those environment variables:

docker run -it \
 --env-file .env \
 --publish 5002:5002/tcp spotifyplaylistpython:latest

At this point, you have a .env file in your project, but it won't be copied into the container because the .dockerignore file has a line to ignore .env. (So does the .gitignore file so that it won't get checked into source.) We use the .env file to pass in environment variables to the container on the command line with the --env-file option. Environment variables contain keys and secrets needed in the program. We don't want them stored inside the container or in a repo checked in to GitHub.

If you are using Visual Studio Code, you can see the see the running images in the CONTAINERS section of the Docker extension. You can also see and work with the container in the Docker Desktop application.

The -it option means runs interactively. You can also run detached. See docker run --help.

Step 4: Check that the container is running.

You can execute a command inside a RUNNING container. For example, if you list the environment variables as show with the first command below, you should see the environment variables passed in with the --env-file option of the run command.

docker exec --interactive --tty <friendly-name-of-container> env
docker exec --interactive --tty <friendly-name-of-container> ls -al

Step 5: Browse the local site.

Go to http://127.0.0.1:5002.


Tuesday, March 10, 2020

Working with Sphinx Extensions and Building to DocFx Output


DocFx output using Sphinx .yml files and Sphinx extensions

Overview


The previous Sphinx/DocFx posts are:

In those posts, we talked about the Sphinx conf.py configuration file for configuring Sphinx to use extensions. An extension is simply a Python module that can be used to extend Sphinx functionality. We used the "sphinx.ext.autodoc" extension to get docstring comments from Python files and we used the "docfx_yaml.extension" extension to instruct Sphinx to export YAML files. In the Sphinx to DocFx post, we had a conf.py file with:

extensions = ["sphinx.ext.autodoc",  "docfx_yaml.extension"]

In this post, we'll discuss two more extensions you can use so that the we have:

extensions = ["sphinx.ext.autodoc", "sphinx.ext.intersphinx", 
              "sphinx.ext.extlinks", "docfx_yaml.extension"]

where:
sphinx.ext.autodoc Import modules for documentation, including pulling in content from docstrings.

docfx_yaml.extension An exporter for the Sphinx autodoc module to produce YAML files for use with DocFX. Seems to need to be at the end of the extensions list. Order is important. The docfx extension needs to be at the end. 
sphinx.ext.intersphinx Generate automatic links to the documentation in other projects like Python base classes. Depends on variable intersphinx_mapping variable in conf.py. See the interpret community repo for an example.

sphinx.ext.extlinks Allows creating a short link for commonly used links that go to subpages of one site.

sphinx.ext.intersphinx


The intersphinx_mapping configuration value is in the conf.py and it can be used to create mappings so that references to other documentation sets (outside of yours) can be referenced.

We'll use the following intersphinx_mapping:

intersphinx_mapping = {
    'Python': ('https://docs.python.org/3', None),
    'Pillow': ('https://pillow.readthedocs.io/en/latest/', None),
    'NumPy': ('http://docs.scipy.org/doc/numpy/', None),
    'pandas': ('http://pandas.pydata.org/pandas-docs/stable/', None),
    'sklearn': ('http://scikit-learn.org/stable', None),
    'matplotlib': ('http://matplotlib.sourceforge.net/', None)
}

To get a link to a Python builtin type at docs.python.org, we need only specify the type name in the type or rtype docstring field as follows:

"""
:type: bool
:rtype: list
"""

And the correct linkages will be made to the docset when Sphinx builds. And, if you wanted to link to these types in text outside of these fields? You can like so:

"""
This is a link to the Python built-in string type: :class:`str`.
"""

It works the same for other doc sets specified in the intersphinx_mapping.

"""
This is a link to :class:`pandas.DataFrame`, this to :mod:`matplotlib.image`,
and this to :func:`numpy.array`.

:type: pandas.DataFrame or numpy.array
:rtype: matplotlib.image
""" 

The big gotcha with using intersphinx_mapping is that if you look at the example above in the Sphinx rendered HTML, you would see pandas.DataFrame, matplotlib.image, and numpy.array are correctly linked to their library types for both the descriptive text and the :type: and :rtype: markup.
However, if you look in the DocFx rendered HTML (from the same docstring), you would see that while the links in the descriptive text do resolve, those in the :type: or :rtype: markup do not. To get around this problem, we need to use a cross reference file in DocFx as described here.  This will be the subject of a future post. (For numpy links, see the stack overflow question.)


This extension is a convenience for avoiding repeatedly typing a URL to a web site you are referencing frequently. The docs for extlinks show how you might use this to link back to GitHub issues. In our tutorial here, we'll create links back to Wikipedia.


In the conf.py file make sure you have extlinks configuration parameter defined like so:

extlinks = {'wiki': 
  ('https://en.wikipedia.org/wiki/%s','Wikipedia: ')
}

Now, suppose in a docstring you want to reference these three Wikipedia pages: https://en.wikipedia.org/wiki/Machine_learning, https://en.wikipedia.org/wiki/Supervised_learning, and https://en.wikipedia.org/wiki/Unsupervised_learning. Your docstring would look like this:

"""
Here are links using markup to make external links easier to
work with. See :wiki:`Machine_learning`, :wiki:`Supervised_learning`,
and :wiki:`Unsupervised_learning`.
"""

This docstring would create the three links like so: Wikipedia: Machine_learning, Wikipedia: Supervised_learning, and Wikipedia: Unsupervised_learning.

You can experiment with the presentation be modifying the extlinks configuration parameter.

Build Example


The steps below follow the post From Sphinx to DocFX - Generating Python API Documentation with DocFx. TIn this tutorial, our goal is to use the new extensions we enabled and show how they appear in the DocFX HTML. The prerequisites are:

  • Sphinx installed
  • DocFx installed
  • Optional: read or ran the previous tutorial

Step 1: Clone the repo travelmarx-blog and start in the \sphinx-extensions-example folder.

Step 2: Create config.py and index.rst files.

Use the instructions in the Sphinx Quickstart post to generate these files, following the suggested answers for the prompts. Or, if you already have these files from that project, you can reuse them here. Your folder structure should look like this.
.
├───build
├───mycode
│   ├───core_api
│   │   ├───package1
│   │   └───package2
│   └───test_api
└───source
    ├───_static
    └───_templates

Step 3: Edit source\config.py to include extensions.

In this tutorial, we are working with four of the extensions mentioned in the intro:

extensions = ['sphinx.ext.autodoc', 'sphinx.ext.intersphinx', 
   'sphinx.ext.extlinks', 'docfx_yaml.extension']

Point to the code folder:

import os
import sys
sys.path.insert(0, os.path.abspath('../mycode'))

Add intersphinx_mapping configuration:

intersphinx_mapping = {
    'Python': ('https://docs.python.org/3', None),
    'Pillow': ('https://pillow.readthedocs.io/en/latest/', None),
    'NumPy': ('http://docs.scipy.org/doc/numpy/', None),
    'pandas': ('http://pandas.pydata.org/pandas-docs/stable/', None),
    'sklearn': ('http://scikit-learn.org/stable', None),
    'matplotlib': ('http://matplotlib.sourceforge.net/', None)
}

Add extlinks configuration:

extlinks = {'wiki': 
  ('https://en.wikipedia.org/wiki/%s','Wikipedia: ')
}

Some of these lines in the config.py file may already exist and you'll have to uncomment them and/or modify them.

Step 4: Run sphinx-apidoc to create .rst (reStructuredText) files describing the code.

In the root folder, run:

sphinx-apidoc -o source .\mycode

This creates .rst files in the \source folder.

Step 5: Modify the source\index.rst file to include the modules.rst file which is the entry point for code to document.

Running sphinx-apidoc will produce a source\modules.rst file by default. The modules.rst file is the entry point for documenting the code in \mycode.

source\index.rst (snippet, add the "modules" line)
Test documentation
=======================
.. toctree::
    :maxdepth: 4
    :caption: Table of Contents  

    modules

Step 6: Run sphinx-build to create Sphinx HTML and create YAML files for DocFx.

In the root folder, run

sphinx-build source build

You may not be interested in Sphinx's HTML, but it's this step which creates the YAML files. It doesn't hurt to check it to see what Sphinx's HTML looks like. To see it, run:

build\index.html

If you are interested in only the Sphinx generated HTML, then you can stop here.

Step 7: Confirm the YAML files were generated.

Starting in root folder, run:

dir build\docfx_yaml

You should see a listing of .yml files like "core_api.package1.someclass.SomeClass.yml".

Step 8: Generate an initial docfx.json file.

In the root folder, run:

docfx init -q

This will create a docfx_project folder with the docfx.json configuration file.

Step 9: Copy the Sphinx YAML files to the docfx_project folder.

Copy .\build\docfx_yaml\* to .\docfx_project\api\*

Step 10: Build the DocFx HTML and serve the docs on localhost.

Starting in the root folder, run:

docfx docfx_project\docfx.json --serve

Step 11: View the HTML docs produced by DocFx.

Go to http://localhost:8080.

You will note that there are some warnings in the DocFx output for things to address. Mostly invalid links.

Build Cycle


So running through the build once is great, but what about an authoring flow that works for the fix-build-verify cycle. Well that's where it gets messy with both Sphinx and DocFx we've found. We find that cleaning out previous build artifacts and building everything works the best. To this end we create a simple batch file (for Windows) that looks like the following:

REM For best results cleaning out directories works the best

del build\* /Q
del build\docfx_yaml\* /Q
rmdir docfx_project\_site /S /Q
rmdir docfx_project\obj\.cache /S /Q

del source\core_*.rst /Q
del source\modules.rst /Q
del source\test_*.rst /Q

REM Run sphinx commands

sphinx-apidoc -o source .\mycode -f
sphinx-build -a source build

REM Copy the sphinx generated yaml files to the docfx folder

copy .\build\docfx_yaml\* .\docfx_project\api\*

REM Build and serve docfx html
docfx docfx_project\docfx.json --serve


Tuesday, February 25, 2020

From Sphinx to DocFX - Generating Python API Documentation with DocFx

Overview


In a previous post Sphinx Quickstart, we covered a very basic setup of Sphinx. In this post, we go farther and talk about Sphinx DocFX YAML, an exporter for the Sphinx Autodoc module. Our goal is to produce YAML files that can be consumed by DocFX, a documentation generator for .NET that also converts YAML files to HTML. Many doc sets at https://docs.microsoft.com/ are generated with DocFX, including Python doc sets that use Sphinx to generate YAML, which is then converted to HTML with DocFX.

Terminology


To understand how to go from Sphinx to DocFX using the Sphinx DocFX YAML exporter, we need to break down some of the terms used...or at least we did to make sense of it all.

Sphinx

  • Sphinx is a documentation generator, it was originally created for Python documentation, but can be used for a range of languages.
  • Sphinx uses reStructuredText (rST) as its markup language. Sphinx's utility comes from the power and straightforwardness of reStructuredText (reST) and its parsing and translating suite, Docutils. reST is used both in .rst files and in docstrings in .py files.
  • In the Quickstart, we created an example reSt file (foo.rst) and built HTML documentation from it. 
  • Autodoc is an extension for Sphinx. (Sphinx is extensible to support the needs of different projects. An extension is simply a Python module.)
  • Autodoc adds directives like "autofunction" and "automodule". These directives determine what API is used to generate docs.
  • When using the autodoc extension (added in the conf.py file) with Sphinx, you are including documentation from Python docstrings. A Python docstring is a string literal that occurs as the first statement in a module, function, class, or method definition. Such a docstring becomes the __doc__ special attribute of that object.
  • When you run the command sphinx-build (or make html if it was created), Sphinx autodoc generates the API documentation for your Python project code using the index.rst (this is the default name, but it can be any name you want). Sphinx imports the code via standard Python import mechanisms, and then generates the proper reST in the Sphinx Python domain. The reST files are then parsed to create doctree files used internally in Sphinx to generate HTML. If you only want the HTML output from Sphinx (and not DocFX), then you can stop here. This is the point at which the post Sphinx Quickstart stops.

sphinx-build

  • Usage: sphinx-build [options] <sourcedir> <outdir> [filenames...]
  • (If you ran sphinx-quickstart, you had the option of creating a make file so that you can just type make html instead of sphinx-build.)
  • This command creates documentation from files in <sourcedir>and places HTML in <outputdir>.
  • This command command looks for <sourcedir>/conf.py for configuration settings.
  • This command creates documentation in different formats. A format can be specified on the command line, otherwise it defaults to HTML. (Check the conf.py file if in doubt.)
  • By default, everything that is outdated is built. Output only for selected files can be built by specifying individual filenames.
  • Since Sphinx has to read and parse all source files before it can write an output file, the parsed source files are cached as “doctree pickles”. Normally, these files are put in a directory called .doctrees under the build directory.
  • If you didn't run the Sphinx Quickstart and don't have an index.rst file to start with, then you could use the sphinx-apidoc command to create module .rst files that would be equivalent to index.rst.

Sphinx DocFx YAML

  • Sphinx DocFX YAML is an exporter for the Sphinx Autodoc module that produces YAML files adhering to the DocFX YAML metadata specification. For more information, see readthedocs.
  • DocFX YAML describes language metadata for programming languages. The main user scenario for language metadata is to generate reference documentation. Specifically, we can use the YAML as input to DocFX and let DocFX generate HTML.
  • YAML files represent the API documentation. Example.
  • DocFX stands for Document Frameworks. To use it, add the extension to the source\conf.py file like so:

    extensions = ['sphinx.ext.autodoc', 'docfx_yaml.extension']
  • With exporter added to conf.py, use Sphinx DocFx as usual by running the command make html.
DocFX

  • DocFX generates API reference documentation from triple-slash comments in C#\VB  source code. Or, it can consume YAML files and render them as HTML.
  • It also allows you to use Markdown files to create additional topics such as tutorials and how-tos, and to customize the generated reference documentation.
  • The punchline is this: From a Python project using Autodoc and SphinxDocFX YAML exporter, you can generate YML files to be used with DocFX. This is what the example below does.
  • Why? Because HTML generated from DocFX has a number of benefits beyond the HTML generated from Sphinx, including API cross referencing, generating from markdown files (.md) alongside API reference, customizable themes and templates.  

An Example


Prerequisites:


Step 1: Clone the travelmarx-blog repo and start in the sphinx-docfx-example directory.

sphinx-docfx-example folder is the root folder. in subsequent steps. You should have the following:
.
└───mycode
    ├───core_api
    │   ├───package1
    │   └───package2
    └───test_api

Step 2: Create config.py and index.rst files.

See the Sphinx Quickstart for information about running the sphinx-quickstart command. Your folder structure should look like this.
.
├───build
├───mycode
│   ├───core_api
│   │   ├───package1
│   │   └───package2
│   └───test_api
└───source
    ├───_static
    └───_templates

Step 3: Edit source\config.py.

Configure the extensions:
extensions = ['sphinx.ext.autodoc', 'docfx_yaml.extension']
Point to the code folder:
import os
import sys
sys.path.insert(0, os.path.abspath('../mycode'))
Some of these lines in the config.py file may already exist and you'll have to uncomment them.

Step 4: Run sphinx-apidoc to create .rst (reStructuredText) files describing the code.

Starting in the sphinx-docfx-example (root) folder, run:
sphinx-apidoc -o source .\mycode
This creates .rst files in the \source folder.

Step 5: Modify the source\index.rst to include modules to document.

Running sphinx-apidoc will produce a source\modules.rst file by default. The modules.rst file is the entry point for documenting the code in \mycode.

source\index.rst (snippet, add the part in red)

Test documentation
=======================
.. toctree::
    :maxdepth: 4
    :caption: Table of Contents
 
    modules

Step 6: Run sphinx-build to create Sphinx's HTML.
sphinx-build source build
Besides building the Sphinx HTML (which you may not care about), this also creates .yml files in the \build\docfx_yaml folder. These will be used in a later step with DocFx.

To view the Sphinx HTML, starting in the root folder, run:
build\index.html
For comparison with docFx HTML (which is generated in Step 7), here is the Sphinx-generated HTML:


Step 7: Confirm that YAML files were generated.

Starting in root folder, run:
dir build\docfx_yaml
You should see a listing of .yml files like "core_api.package1.someclass.SomeClass.yml".

Step 8: Generate an initial docfx.json file.

Starting in the root folder, run:
docfx init -q
This will create a docfx_project folder with the docfx.json configuration file.

Step 9: Copy the Sphinx YAML files to the \docfx_project folder.

Copy .\build\docfx_yaml\* to .\docfx_project\api\*

Step 10: Build the DocFx HTML and serve the docs.

Starting in docfxtest folder, run:
docfx docfx_project\docfx.json --serve

Step 11: View the HTML docs produced by DocFx.

Go to http://localhost:8080.


Some points to note:

  • The difference in the look between Sphinx HTML and DocFx HTML. Both can be customized as needed.
  • How the link to "AnotherClass" is an active link in the DocFX screenshot. This is one of the benefits of using DocFx, cross reference linking.
  • We didn't add any "Articles" (.md files) but that is also a nice feature of DocFx, to integrate API and conceptual (articles) docs. For example of how that could be done, see our Scrapbook101core site.
  • On subsequent runs through the steps above (say, if you changed a docstring in the code), you will typically:
    • delete content in \build folder
    • run steps 6, 9, and 10.

Next Steps:

  • Customize docfx.json file.
  • Read up on cross-linking with DocFx.
  • Add other markdown files (.md) along with API docs.


Monday, February 24, 2020

Sphinx Quickstart


Generate files


The instructions here are for Windows. With slight modifications, they can be applied to other platforms. The code for this post is at https://github.com/travelmarx/travelmarx-blog/tree/master/sphinx-quickstart.

Make sure you have Sphinx installed, then clone the travelmarx-blog repo to your local environment. Starting in the sphinx-quickstart directory you should have the following:

> tree
│   .gitignore

└───mycode
        myclasses.py
        __init__.py

Run the Sphinx quickstart command.

> sphinx-quickstart

Accept defaults for everything except these parameters.
  • Separate source and build directories (y/n) [n]: Y
  • Project name: MyTestDocs
  • Author name(s): your-alias
  • autodoc: automatically insert docstrings from modules: (y/n) [n]: Y 
The last setting for configuring autodoc is important. When answering the quickstart questions, it can be easy to accept the default for this setting which is not to install it. The autodoc extension is configured in the source\conf.py file like so:

extensions = ['sphinx.ext.autodoc']

Build the HTML. The command make html is a convenience for running the command sphinx-build -b html sourcedir buildir. The make file assumes current directory is source directory, and it creates the build directory "build". HTML is the default doc type produced.

> make html
> tree

> tree
├───build
│   ├───doctrees
│   └───html
│       ├───_sources
│       └───_static

├───mycode
└───source
    ├───_static
    └───_templates

Open the docs.

> build\html\index.html

At this point you have basically a framework to build on, but not much else. The index.html page should look like this.


The index.rst file


In the sphinx-quickstart\source folder there should be an index.rst file. Edit the file to add the automodule to automatically document members of a module myclasses.py.

> type index.rst
.. MyTestDocs documentation master file, created by
   sphinx-quickstart on Thu Jun 20 14:06:30 2019.
   Adapt this file to your liking, but it should at least
   contain the root `toctree` directive.

Welcome to MyTestDocs's documentation!
======================================

.. toctree::
   :maxdepth: 2
   :caption: Contents:

.. automodule:: myclasses
   :members:

Indices and tables
==================

* :ref:`genindex`
* :ref:`modindex`
* :ref:`search`

The index file is the initial documentation file. You can see that lines in the index.rst appear in the index.html shown above. The index.rst file can contain reStructuredText documentation and directives (the same that appear in Python docstrings). In the example above, we are using automodule to indicate that the docstrings in myclasses should be documented.

Add test Python code


If you cloned the repo, you should have the following:

  • mycode\myclasses.py module.
  • mycode\__init__.py file, which signals that the directory contains a package.


Edit the source\config.py to so that Sphinx can find the code. Here are the lines:

import os
import sys
sys.path.insert(0, os.path.abspath('../mycode'))

Make sure the import lines are not commented out, i.e., have a "#" in front of them.

Here are the two files __init__.py and myclasses.py.

mycode\__init__.py
import myclasses

mycode\myclasses.py
class SimpleClass:
    """A simple example class"""
    i = 12345

    def f(self):
        return 'hello world'

class Person:
    """Creates a Person based on name and age."""
    def __init__(self, name, age):
        self.name = name
        self.age = age


Back in the root folder of sphinx-quickstart, rebuild:

> make html

The output should look something like this, which includes docstrings in myclasses.py:


If your code folder is outside the "doctest" folder, make changes to the os.path.abspath in the conf.py file as appropriate.

Your final directory structure should look like this:

>tree
├───build
│   ├───doctrees
│   └───html
│       ├───_sources
│       └───_static
├───mycode
│   └───__pycache__
└───source
    ├───_static
    └───_templates


reStructuredText


Let's add a little more functionality to this quickstart. Suppose we have a file foo.rst that contains documentation we want to include as well. Then we can add foo.rst and make sure it is documented by adding a reference to foo in index.rst:

source\foo.rst

foo module
==========

This is the foo module description.

.. note::

   This is a note.

source\index.rst  (changed part in red)

.. toctree::
   :maxdepth: 2
   :caption: Contents:

   foo

.. automodule:: myclasses
   :members:

The syntax you can use inside of foo.rst is described in Sphinx reStructuredText. At this point in our quickstart, we have HTML generated documentation with some content coming from reStructuredText in an .rst file and some content coming from reStructuredText in docstrings in .py files.

Build the docs again:

> make html

Notice that "foo" appears in doc contents.

If interested, go to the next post in the series: From Sphinx to DocFX - Generating Python API Documentation with DocFx.

Wednesday, March 27, 2013

Working with Amazon S3 Using the Boto Library

Example of Working with Python Modules Described in this Post
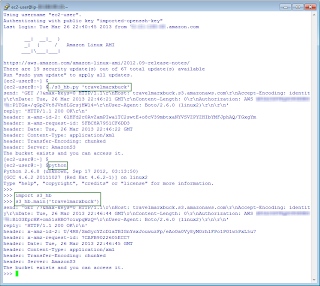
Example of Working with Python Modules Described in this Post

Overview

The goal of this post is to help you get familiar with the boto library as an interface to Amazon Web Services and to do that by trying some simple tasks using Amazon S3. (In case you haven't made the connection yet, boto refers to a type of dolphin native to the Amazon and referred to as Boto in Portuguese.)

Of course if you don't care about rolling your own, but want to use Python, you can use the AWS SDK for Python which has support for S3. With that SDK you can use commands like this "aws s3 list-objects --bucket bucketname". Read on if you are less interested in a command line interface - which the AWS SDK for Python is - and want to see how to create your own Python scripts for working with Amazon S3.

In terms of working with Amazon S3, I was curious to see how I could use Amazon S3 seemlessly from a command shell, manipulating buckets and objects. I was inspired by trying the Google Cloud Storage gsutil tool.

One thing you might note is that the AWS site for Python points to the AWS site for AWS SDK for Python (Boto) which tells you basically to install the boto library assuming you already have Python. In other words, this library is not like the Java or .NET libraries that support AWS services. Even the URL for the docs (boto.readthedocs.org) tells you that something is different since it is not hosted on the AWS domain: docs.aws.amazon.com.


Prerequisites Before Running the Modules

1. Python installed. I run Python 2.6 on an Amazon Linux AMI. Boto currently requires greater than Python 2.5. In particular, I followed the setup instructions here: http://www.pip-installer.org/en/latest/installing.html

$ curl -O https://raw.github.com/pypa/pip/master/contrib/get-pip.py
$ [sudo] python get-pip.py
$ pip install boto

2. AWS Access Key ID and Secret Access Key to access the buckets you want to work with.

  • If you are the account owner, great, nothing more to do.
  • If you are an IAM user, work with the account owner to get the keys and access to the bucket.

3. Python configured to use the Access Key ID and Secret Access Key as suggested here: http://boto.readthedocs.org/en/latest/boto_config_tut.html.

4. Familiarity with the Python interpreter. I work in and out of the interpreter which I find useful when creating a module. For more information on the interpreter, see Chapter 2. Using the Python Interpreter. One very helpful command you can use in the interpreter is the build-in function dir()which uncovers which names a module defines, basically which properties and methods you can use.

5. An editor. Any editor will do. I use VIM since I developed these modules on Linux.


Usage Notes

Note 1 The very first issue I ran into was a bucket casing issue. If you read the bucket naming guidelines, it states the uppercase characters are okay only for buckets created in the US Standard Region. But even then, if you try to access the bucket using a virtual hosted-style request, e.g. http://MyAWSBucket.s3.amazonaws.com, you will get a bucket not found error. If you use the path style request, e.g. http://s3.amazonaws.com/MyAWSBucket/ then it will work.

To access mixed case named buckets you have to tell the boto library to do so as described here. Boto by default uses virtual hosted-style requests. You can see this by setting the debug level to 2 as described in the Config docs. Short answer is: use lowercased bucket names.

Note 2 The logic for dealing with input arguments was intentionally kept minimal in the modules shown here. In the context of a module, the __name__ global variable is equal to the name of the module. When a module is executed as a script, __name__ is set to __main__. So the common strategy is to check the value of __name__ and if it is equal to __main__ then you know you are dealing with a scripting situation and you can check for input arguments. For more information about modules, see the Python documentation, Chapter 6. Modules. This Artima Developer article provides some different ways of dealing with arguments that are interesting.

Note 3 Some of the modules here show code with fixed parameters (e.g., bucket name) and are not as interesting as a module that takes input arguments like bucket name. This post shows two types of modules, the first type is illustrative and has hardcoded parameters. The second type of module can be takes input arguments.

Note 4 To make a module more useful, you can make the module executable so you don't have to type "python module.py" to run it. Instead you can type "./module.py". Make the module executable by doing the following:

  • Put #!/usr/bin/env python as the first line in the module.
  • Change the script to executable, e.g. chmod +x s3-lb.py

Note 5 You can run modules in the interpreter as well by importing them and then passing in arguments. For example, you can run modules in the interpreter like so:

>>>import s3_hb, s3_lb
>>>s3_lb.main('')
>>>s3_hb.main('mybucketname')

where s3_hb and s3_lb are modules defined in s3_hb.py and s3_lb.py, respectively. s3_lb.py takes an optional argument. s3_hb.py has one required argument.

If the module named in the import doesn't have a check for __name__ the import action seems to run the module at least on first import.


Modules

Module summary.

Functionality Module w/ no Arguments Module w/ Arguments
optional in italics
List buckets listbuckets.py s3_lb.py (bucket name filter)
Create bucket
Delete bucket
createdeletebucket.py s3_cb.py (bucket name)
s3_db.py (bucket name)
Head bucket (see if the bucket exists and you have access to it) headbucket.py s3_hb.py (bucket name)
List objects in a bucket listobjects.py s3_lo.py (bucket name, key prefix)
Get objects in a bucket
Put objects in a bucket
getputobject.py s3_go.py (bucket name, key)
s3_po.py (bucket name, file)
Delete an object deleteobject.py s3_do.py (bucket name)
Describe bucket lifecycle lifecycle.py  


List Buckets (listbuckets.py)

#!/usr/bin/env python
#list buckets
import boto
conn = boto.connect_s3()
rs = conn.get_all_buckets()
print '%s buckets found.'%len(rs)
for b in rs:
print b.name


List Bucket with Arguments (s3_lb.py)

#!/usr/bin/env python
#list buckets
import sys
import boto.exception

def main(name_fragment):
conn = boto.connect_s3()
try:
rs = conn.get_all_buckets()
for b in rs:
if b.name.find(name_fragment)> -1:
print b.name
except Exception, ex:
print ex.error_message

if __name__ == "__main__":
name_fragment = ''
if len(sys.argv)==2:
name_fragment = sys.argv[1]

main(name_fragment)


Create/Delete a Bucket (createdeletebucket.py)

#!/usr/bin/env python
#create and delete bucket in the standard region
import boto
from datetime import datetime

bucket_name = 'auniquebucketname'+datetime.now().isoformat().replace(':','-').lower()
conn = boto.connect_s3()
conn.create_bucket(bucket_name)

print 'Creating a bucket %s '%bucket_name
bucklist = conn.get_all_buckets() #GET Service
for b in bucklist:
if b.name == bucket_name:
print 'Found bucket we created. Creation date = %s'%b.creation_date

print 'Deleting the bucket.'

conn.delete_bucket(bucket_name)


Create a Bucket with Arguments (s3_cb.py)

#!/usr/bin/env python
#create bucket
import sys
import boto.exception

def main(bucket_name):
conn = boto.connect_s3()
try:
conn.create_bucket(bucket_name)
print 'Creating bucket %s '%bucket_name
bucklist = conn.get_all_buckets() #GET Service
for b in bucklist:
if b.name == bucket_name:
print 'Bucket exists. Creation date = %s'%b.creation_date
except Exception, ex:
print ex.error_message

if __name__ == "__main__":
if len(sys.argv)==2:
bucket_name = sys.argv[1].lower()
main(bucket_name)
else:
print 'Specify a bucket name.'
print 'Example: s3_cb.py bucketname'
sys.exit(0)


Delete a Bucket with Arguments (S3_db.py)

#!/usr/bin/env python
#delete bucket
import sys
import boto.exception

def main(bucket_name):
conn = boto.connect_s3()
try:
conn.delete_bucket(bucket_name)
print 'Deleting bucket %s '%bucket_name
if conn.lookup(bucket_name) == None:
print 'Bucket deleted.'
else:
print 'Bucket may not have been been deleted.'
except Exception, ex:
print ex.error_message

if __name__ == "__main__":
if len(sys.argv)==2:
bucket_name = sys.argv[1].lower()
main(bucket_name)
else:
print 'Specify a bucket name.'
print 'Example: s3_db.py bucketname'
sys.exit(0)


Head Bucket (headbucket.py)

#!/usr/bin/env python
#head bucket
#determine if a bucket exists and you have permission to access it
import boto
import boto.exception
conn = boto.connect_s3()
try:
buck = conn.get_bucket('travelmarxbucket')
print 'The bucket exists and you can access it.'
except Exception, ex:
#print ex.args

print ex.error_message


Head Bucket with Arguments (s3_hb.py)

#!/usr/bin/env python
#head bucket
import sys
import boto.exception

def main(bucket_name):
conn = boto.connect_s3()
try:
buck = conn.get_bucket(bucket_name)
print 'The bucket exists and you can access it.'
except Exception, ex:
print ex.error_message

if __name__ == "__main__":
if len(sys.argv)==2:
bucket_name = sys.argv[1]
main(bucket_name)

else:
print 'Received %s arguments'%len(sys.argv)
print 'Specify a bucket name.'
print 'Example: s3_hb.py bucketname'

sys.exit(0)


List Object in a Bucket (listobjects.py)

#!/usr/bin/env python
#list objects in a bucket
import boto
conn = boto.connect_s3()
try:
buck = conn.get_bucket('travelmarxbucket')
bucklist = buck.list()
for key in bucklist:
print key.name
except:
print 'Can\'t find the bucket.'


List Objects in a Bucket with Arguments (s3_lo.py)

#!/usr/bin/env python
#list a bucket with optional prefix
import sys
import boto.exception

def main(bucket_name, prefix):
conn = boto.connect_s3()
try:
buck = conn.get_bucket(bucket_name)
bucklist = buck.list(prefix=prefix)
count = 0
for key in bucklist:
print key.name
count +=1
print '%s key(s) found.'%count

except Exception, ex:
print ex.error_message

if __name__ == "__main__":
if len(sys.argv)>=2:
bucket_name = sys.argv[1]
if len(sys.argv)==3:
prefix = sys.argv[2]
else:
prefix = ''
main(bucket_name, prefix)

else:
print 'Specify at least a bucket name and optionally a prefix.'
print 'Example: s3_lo.py bucketname prefix'
sys.exit(0)


Put/Get Object in a Bucket (getputobject.py)

#!/usr/bin/env python
#put and get objects
import boto
from boto.s3.key import Key
conn = boto.connect_s3()
buck = conn.get_bucket('travelmarxbucket')

key = Key(buck)

# add a simple object from a string
key.key = 'testfile.txt'
print 'Putting an object...'
key.set_contents_from_string('This is a test.')

# get the object
print 'Getting an object...'
key.get_contents_as_string()

# create a test file
f = open('testfile-local.txt','w')
f.write('A local file. This is a test.')
f.close()

# add an object (upload the file)
key.key = 'testfile-local.txt'
key.set_contents_from_filename('testfile-local.txt')

# get the object
key.get_contents_to_filename('testfile-local-retrieved.txt')


Get Object in a Bucket with Arguments (s3_go.py)

#!/usr/bin/env python
#get object
import sys
import boto
from boto.s3.key import Key
import boto.exception

def main(bucket_name, key):
conn = boto.connect_s3()
try:
buck = conn.get_bucket(bucket_name)
key_fetch = Key(buck)
key_fetch.key = key
key_fetch.get_contents_to_filename(key)
except Exception, ex:
print ex.error_message

if __name__ == "__main__":
if len(sys.argv)>=3:
bucket_name = sys.argv[1]
key = sys.argv[2]
main(bucket_name, key)

else:
print 'Specify a bucket name and key to fetch.'
print 'Example: s3_go.py bucketname key'
sys.exit(0)


Put Object in a Bucket with Arguments (s3_po.py)

#!/usr/bin/env python
#put object
import os
import sys
import boto
from boto.s3.key import Key
import boto.exception

def main(bucket_name, file):
conn = boto.connect_s3()
try:
buck = conn.get_bucket(bucket_name)
key_upload = Key(buck)
key_upload.key = file
key_upload.set_contents_from_filename(file)
except Exception, ex:
print ex.error_message

if __name__ == "__main__":
if len(sys.argv)>=3:
bucket_name = sys.argv[1]
file= sys.argv[2]
if os.path.isfile(file) == False:
raise Exception('File specified does not exist.')
main(bucket_name, file)

else:
print 'Specify a bucket name and file to upload.'
print 'Example: s3_po.py bucketname file'
sys.exit(0)


Delete an Object in a Bucket (deleteobject.py)

#!/usr/bin/env python
#delete object
import boto
from boto.s3.key import Key
conn = boto.connect_s3()
buck = conn.get_bucket('travelmarxbucket')
key = Key(buck)
key.key = 'testfile.txt'
if key.exists() == True:
key_deleted = key.delete()
if key_deleted.exists() == False:
print 'Key was deleted.'
else:

print 'Key doesn\'t exist'


Delete an Object in a Bucket with Arguments (s3_do.py)

#!/usr/bin/env python
#delete object
import sys
import boto
from boto.s3.key import Key
import boto.exception

def main(bucket_name, key):
conn = boto.connect_s3()
try:
buck = conn.get_bucket(bucket_name)
key_to_delete = Key(buck)
key_to_delete.key = key
if key_to_delete.exists() == True:
key_deleted = key_to_delete.delete()
if key_deleted.exists() == False:
print 'Key was deleted.'
else:
print 'Key doesn\'t exist'

except Exception, ex:
print ex.error_message

if __name__ == "__main__":
if len(sys.argv)>=3:
bucket_name = sys.argv[1]
key= sys.argv[2]
main(bucket_name, key)

else:
print 'Specify a bucket name and key to delete.'
print 'Example: s3_do.py bucketname file'
sys.exit(0)


Get a Bucket Lifecycle (lifecycle.py)

#!/usr/bin/env python
#get bucket lifecycle
import boto
from boto.s3.key import Key
conn = boto.connect_s3()
buck = conn.get_bucket('travelmarxbucket')
print 'Lifeycle for %s'%buck.name
try:
lifecycle = buck.get_lifecycle_config()
for rule in lifecycle:
print '\nID: %(1)s, status %(2)s' % {'1':rule.id, '2':rule.status}
days_expiration = rule.expiration.days if hasattr(rule.expiration, 'days') else 'Not set.'
days_transition = rule.transition.days if hasattr(rule.transition, 'days') else 'Not set.'
print 'Expiration days: %(1)s, Transition: %(2)s' % {'1': days_expiration,'2':days_transition}
except:
print 'Lifecycle not defined.'