Monday, September 27, 2010

Messenger Connect - Initializing Controls

Roadmap

This post is part of a series of related posts on how to use Windows Live Messenger Connect.

1. Messenger Connect REST Explorer for exploring Windows Live resources.
2. Messenger Connect JavaScript API for listing your contacts.
4. (this post) Messenger Connect - Initializing Controls

Overview

Comparing Control Creation
A Page Displaying Three Different Initialization Techniques

There are two concepts that are discussed in this post, how to initialize controls declaratively and programmatically and how to deal with the onload event of the App tag in a master child page scenario. The code presented here will result in a page shown in the image above.

Multiple App onLoad Handlers

Let's take the second point first since it is easier. If you download the templates that allow you to easily create a Messenger Connect web application, as discussed in previous posts in this thread, you will see that the App tag is defined in the master page (Site.Master.aspx) as something like this:


<wl:app
channel-url="<%=WebConfigurationManager.AppSettings["wl_wrap_channel_url"]%>"
callback-url="<%=WebConfigurationManager.AppSettings["wl_wrap_client_callback"]%>?<%=SessionId%>"
client-id="<%=WebConfigurationManager.AppSettings["wl_wrap_client_id"]%>"
scope="WL_Profiles.View, Messenger.SignIn"
onload="appLoaded">
</wl:app>


In the same master page you will see the JavaScript handler for the onload event:


<script type="text/javascript">
function appLoaded() {
}
</script>


The appLoaded function doesn't do anything in the code above but that's where you would put functionality. The dilemma I ran into was if in a child page (which inherits from the master page) you could put another handler to handle the onload event. You can't have more than one App tag so you can't just put another App tag on the child page with an onload attribute pointing to a local function on the page. (The App class is like a static class and you only have one instance of it in your web application.) The best solution I could come up with is to use a function that is not called out in the documentation but that you can easily see if you look through the Microsoft.Live.debug.js resource file. It is the
Microsoft.Live.Core.Internal.EventUtil
function which has the method addHandler(handlers, eventName, functionName) where handlers is the event handler list to modify, eventName is the name of the event, and functionName is the name of the function to invoke for the event. So you could do this in the child page:


Microsoft.Live.Core.Loader.onReady(function () {
Microsoft.Live.Core.Internal.EventUtil.addHandler(Microsoft.Live.App._handlers, 'onload', 'childPageAppLoaded');
});
// non-debug
// Microsoft.Live.Core.Internal.EventUtil.addHandler(Microsoft.Live.App.$1, 'onload', 'childPageAppLoaded');
});

function childPageAppLoaded(applicationLoadCompletedEventArgs) {
}
if you use the debug version of the library: loader.debug.js. If you use the loader.js (more typical scenario) _handlers becomes $1 as shown above in the code commented out.

I'm not sure this is the best solution, but it works. It feels like there should be a more elegant solution to this problem that doesn’t require using API pieces that are not documented.

You can see the contents of the Microsoft.Live.debug.js resource by setting a breakpoint in Visual Studio, say in the appLoaded function, and looking at the Script Documents node in the Solution Explorer when you reach the breakpoint. Too use Microsoft.Live.debug.js use the debug loader: http://js.live.net/4.0/loader.debug.js or else you will get Microsoft.Live.js which is minified and hard to read. See the image below for details:

Viewing Microsoft.Live.js resource
Solution Explorer During Debugging

Initializing Controls

Now on to the main point of this post, initializing controls. All UI controls in Messenger Connect can be created by specifying them in markup (declaratively) or using the $create method (programmatically). UI controls in the Microsoft.Live.UI namespace additionally have an initialize method that allows creating them in that way as well. The following working page (derives from the master page in the template) compares all three methods for the Microsoft.Live.UI.SignIn control and the Microsoft.Live.UI.Messenger.DisplayPictureControl. The result of running this page is shown in the image accompanying this post.

The code:


<%@ Page Title="" Language="C#" MasterPageFile="~/Site.Master" AutoEventWireup="true" CodeBehind="CreatingControls.aspx.cs" Inherits="WindowsLiveWebApplicationBeta.CreatingControls" %>
<asp:Content ID="Content1" ContentPlaceHolderID="HeadContent" runat="server">
<script type="text/javascript">

Microsoft.Live.Core.Loader.onReady(function () {
Microsoft.Live.Core.Internal.EventUtil.addHandler(Microsoft.Live.App.$1, 'onload', 'childPageAppLoaded');
});

function childPageAppLoaded(applicationLoadCompletedEventArgs) {
// Create a sign-in control using $create
Microsoft.Live.Core.Loader.onReady(function () {
Microsoft.Live.Core.Loader.load(["Microsoft.Live", "Microsoft.Live.UI", "Microsoft.Ajax.Core"], function () {
$create(Microsoft.Live.UI.SignIn,
{ signedOutText: '$create: Sign In', signedInText: '$create: Sign Out' },
{ signin: signInCallbackCreate, signout: signOutCallbackCreate },
{},
$get('ControlsDiv2')
);
});
});
// Create a display-picture controls using $create.
Microsoft.Live.Core.Loader.onReady(function () {
Microsoft.Live.Core.Loader.load(["Microsoft.Live", "Microsoft.Live.UI"], function () {
$create(Microsoft.Live.UI.Messenger.DisplayPictureControl,
{ cid: '$user'},
{},
{},
$get('ControlsDiv3')
);
});
});


// Create a sign-in control using the API
Microsoft.Live.Core.Loader.onReady(function () {
Microsoft.Live.Core.Loader.load(['microsoft.live', 'microsoft.live.ui'], function () {
signInControl = new Microsoft.Live.UI.SignIn($get('ControlsDiv1'));
signInControl.set_signedInText('API: Sign Out');
signInControl.set_signedOutText('API: Sign In');
signInControl.add_signin(signInCallbackProg);
signInControl.add_signout(signOutCallbackProg);
signInControl.initialize();
isDefined = true;
});
});

}

// Callbacks for declarative control.
function SignedInCallback(signInCompletedEventArgs) {
alert('reached signInCallback');
}
function SignedOutCallback() {
}
// Callbacks for API control.
function signInCallbackProg(signInCompletedEventArgs) {
alert('reached signInCallbackProg');
}
function signOutCallbackProg() {
}

// Callbacks for API control.
function signInCallbackCreate(signInCompletedEventArgs) {
alert('reached signInCallbackCreate');
}
function signOutCallbackCreate() {
}

</script>
<style type="text/css">
div.left { float: left; width: 250px; border: 1px solid blue; min-height: 300px; padding: 5px;}
div.output {clear: both;}
ul { list-style-type: none;}
</style>
</asp:Content>
<asp:Content ID="Content2" ContentPlaceHolderID="MainContent" runat="server">
<div id="welcome">
<h1>
SignIn and DisplayPicture - Different Approaches for Creating a Control</h1>
<div class="left">
<h4>Using Declarative Markup</h4>
<wl:signin onsignin="SignedInCallback" onsignout="SignedOutCallback" signedouttext="Declarative: Sign In" signedintext="Declarative: Sign Out">
</wl:signin>
<wl:display-picture cid="$user"/>
<br />
These controls were created by placing <pre>&lt;wl:signin /&gt;
&lt;wl:display-picture/&gt;</pre>in the HTML.
</div>
<div class="left">
<h4>Using Microsoft.Live.SignIn.UI API</h4>
<div id="ControlsDiv1"></div>
<br />
This was added during the application load using Microsoft.Live.UI.Signin. The controls in the
this namespace Microsoft.Live.UI have an initialize() method which allows the controls to
be created programmatically without using $create directly.
</div>
<div class="left">
<h4>Using $create.</h4>
<div id="ControlsDiv2"></div>
<div id="ControlsDiv3"></div>
<br />
These controls were added during the application load using $create (or <a href="http://msdn.microsoft.com/en-us/library/bb310863.aspx">Sys.Component.create</a>).
</div>
<div class="output"><span id="Output" runat="server" ></span></div>
</div>
</asp:Content>

Friday, September 17, 2010

Note on Using LINQ to Query an Atom Feed

More generally, this note is about using LINQ to query XML with one or more namespaces. I ran into the problem of querying XML with one or more namespaces when querying data from Windows Live using the Messenger Connect APIs (this post describes what I was doing). I scratched my head for a while wondering why my LINQ queries didn’t return anything. The XML in question in this example was an Atom feed from a Windows Live endpoint that returns contact information.

In a nutshell, you have to pay attention to what namespaces are defined. My problem was I forgot to consider the default namespace. These two topics on MSDN explain it in more detail: Working with XML Namespaces and Scope of Default Namespaces in C#.

To illustrate the problem precisely, suppose you have the following XML:

<contacts>
<contact>
<name>name</name>
</contact>
</contacts>
XML Listing 1

Then with this C# code you can get the name of the contact.

XDocument xdoc = XDocument.Load(MapPath("~/App_Data/XMLFile.xml"));
var nameQuery1 = xdoc.Descendants("contact");
foreach (XElement nameElement in nameQuery1)
{
Response.Write(nameElement.Element("name").Value);
}
Code Listing 1

Now suppose the XML is defined with a default namespace such as this:

<contacts xmlns="http://travelmarx.blogspot.com">
<contact>
<name>name</name>
</contact>
</contacts>
XML Listing 2

In this case Code Listing 1 would not return the name element because it doesn’t take in account the default namespace. The following code will work:

XNamespace ns = "http://travelmarx.blogspot.com";
var nameQuery2 = xdoc.Descendants(ns + "contact");
foreach (XElement nameElement in nameQuery2)
{
Response.Write(nameElement.Element(ns + "name").Value);
}
Code Listing 2

Now, suppose there is an additional namespace declared with a prefix defined such as this:

<contacts xmlns="http://travelmarx.blogspot.com" xmlns:an="http://anothernamespace">
<contact>
<name>name</name>
<an:note>note</an:note>
</contact>
</contacts>
XML Listing 3

Possible C# code to get the note element is:

XNamespace ns2 = "http://anothernamespace";
var nameQuery3 = xdoc.Descendants(ns + "contact");
foreach (XElement nameElement in nameQuery3)
{
Response.Write(nameElement.Element(ns2 + "note").Value);
}
Code Listing 3

The code examples above are just for illustration purposes. You should make the code more robust, e.g. using try/catch clauses, for your particular application.

The following XML is an excerpt from the Messenger Connect AllContacts ATOM feed. It is followed by code to read it. It runs in the context of a web page, but the code can be easily taken out and used in other scenarios.


<?xml version="1.0" encoding="utf-8"?>
<feed xml:base="http://bay.apis.live.net/V4.1/cid-3333333333333333/" xmlns:xml="http://www.w3.org/XML/1998/namespace" xmlns="http://www.w3.org/2005/Atom">
<title type="text">AllContacts</title>
<id>uuid:1623d873-0cc4-45ac-bea0-8c09fad60370;id=9850</id>
<updated>2010-09-13T20:57:55Z</updated>
<link rel="self" type="application/atom+xml;type=feed" title="self" href="Contacts/AllContacts"/>
<link rel="edit" type="application/atom+xml;type=feed" title="edit" href="Contacts/AllContacts"/>
<entry p3:reserved=" " p4:etag="0001-01-01T00:00:00.0000000" xmlns:p4="http://schemas.microsoft.com/ado/2007/08/dataservices/metadata" xmlns:p3="http://schemas.microsoft.com/ado/2007/08/dataservices">
<id>urn:uuid:F2E3AWHYXZYUVHICHHNFXIXKHQ</id>
<title type="text">Cosentino Luparello</title>
<updated>2010-08-05T19:11:17Z</updated>
<link rel="self" type="application/atom+xml;type=entry" title="self" href="Contacts/AllContacts/F2E3AWHYXZYUVHICHHNFXIXKHQ"/>
<link rel="edit" type="application/atom+xml;type=entry" title="edit" href="Contacts/AllContacts/F2E3AWHYXZYUVHICHHNFXIXKHQ"/>
<category term="Contact" label="Contact" scheme="http://schemas.microsoft.com/ado/2007/08/dataservices/scheme"/>
<content type="application/xml">
<p4:properties xmlns:i="http://www.w3.org/2001/XMLSchema-instance">
<p3:Emails>
<p3:element>
<p3:Type>None</p3:Type>
</p3:element>
</p3:Emails>
<p3:FirstName>Cosentino</p3:FirstName>
<p3:FormattedName>Cosentino Luparello</p3:FormattedName>
<p3:LastName>Luparello</p3:LastName>
<p3:Locations>
<p3:element>
<p3:City>Palermo</p3:City>
<p3:Type>None</p3:Type>
</p3:element>
</p3:Locations>
<p3:PhoneNumbers/>
<p3:Urls/>
</p4:properties>
</content>
</entry>
</feed>
XML Listing 4


<%@ Page Language="C#" AutoEventWireup="true" %>

<%@ Import Namespace="System" %>
<%@ Import Namespace="System.Collections.Generic" %>
<%@ Import Namespace="System.Linq" %>
<%@ Import Namespace="System.Web" %>
<%@ Import Namespace="System.Web.UI" %>
<%@ Import Namespace="System.Xml.Linq" %>
<script runat="server">
public class ContactName
{
public string FirstName { get; set; }
public string LastName { get; set; }
}
protected void Page_Load(object sender, EventArgs e)
{
// Atom namespace.
XNamespace ns = "http://www.w3.org/2005/Atom";
// Dataservices namespace, p3.
XNamespace nsp3 = "http://schemas.microsoft.com/ado/2007/08/dataservices";
// Dataservices metadata namespace, p4.
XNamespace nsp4 = "http://schemas.microsoft.com/ado/2007/08/dataservices/metadata";

XDocument xdoc = XDocument.Load(MapPath("~/App_Data/data.xml"));

Output("Query 1: Selecting content node and then iterating on it to find FirstName and LastName.");
// Select the content nodes directly.
var contentQuery = xdoc.Descendants(ns + "content");
// Iterate over the collection of content nodes.
foreach (XElement contentElement in contentQuery)
{
string firstName = contentElement.Descendants(nsp3 + "FirstName").FirstOrDefault().Value;
string lastName = contentElement.Descendants(nsp3 + "LastName").FirstOrDefault().Value;
Output(firstName + " " + lastName);
}

Output();
Output("Query 2: Selecting FirstName and LastName as string.");
var firstNameQuery = xdoc.Descendants(nsp3 + "FirstName").Select(entry => entry.Value + " " + entry.ElementsAfterSelf(nsp3 + "LastName").First().Value);
foreach (string firstNameEntry in firstNameQuery)
{
Output(firstNameEntry);
}

Output();
Output("Query 3: Selecting FirstName and LastName as ContactName object.");
var contactNameQuery = xdoc.Descendants(nsp4 + "properties").Select(entry => new ContactName
{
FirstName = entry.Element(nsp3 + "FirstName").Value,
LastName = entry.Element(nsp3 + "LastName").Value
});
foreach (var contactNameEntry in contactNameQuery)
{
Output(contactNameEntry.FirstName + " " + contactNameEntry.LastName);
}

Output();
Output("Query 4: Query 3 + filtering results.");
var contactNameFilteredQuery = xdoc.Descendants(nsp4 + "properties")
.Where(entry => entry.Element(nsp3 + "FirstName").Value.ToLower().StartsWith("c"))
.Select(entry => new ContactName
{
FirstName = entry.Element(nsp3 + "FirstName").Value,
LastName = entry.Element(nsp3 + "LastName").Value
});
foreach (var contactNameFilteredEntry in contactNameFilteredQuery)
{
Output(contactNameFilteredEntry.FirstName + " " + contactNameFilteredEntry.LastName);
}
}
protected void Output()
{
Output("");
}
protected void Output(string txt)
{
Label1.Text += txt + "<br/>";
}
</script>
<!DOCTYPE html PUBLIC "-//W3C//DTD XHTML 1.0 Transitional//EN" "http://www.w3.org/TR/xhtml1/DTD/xhtml1-transitional.dtd">
<html xmlns="http://www.w3.org/1999/xhtml">
<head id="Head1" runat="server">
<title>Reading Windows Live Contact Atom Feed</title>
</head>
<body>
<form id="form1" runat="server">
<div>
Using LINQ extension methods and lambda expressions.<br />
<asp:Label ID="Label1" runat='server'></asp:Label>
</div>
</form>
</body>
</html>
Code Listing 4

Tuesday, September 14, 2010

Messenger Connect – Getting Contacts Three Different Ways

Roadmap
This post is part of a series of related posts on how to use Windows Live Messenger Connect.

1. Using Messenger Connect REST Explorer for exploring Windows Live resources.
2. Using the Messenger Connect JavaScript API for listing your contacts.
3. (this post) Getting contacts in three different ways (API and REST).
4. Messenger Connect - Initializing Controls

Overview

Comparing Three Ways of Getting Contacts
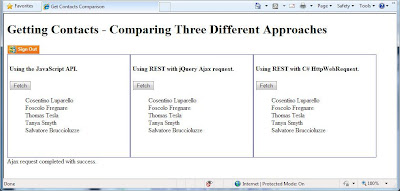
A Page That Gets Contacts Three Different Ways

This post compares side-by-side three methods of getting a resource (in this case we stick with contacts):

1. Using the JavaScript API
- Pros: API does all the hard work for you; no cross browser issues.
- Cons: You have to load a library.

2. Using the REST endpoint directly and getting data with a jQuery.ajax call.
- Pros: Stays all in JavaScript; jQuery makes it easy.
- Cons: Cross-browser issues (to work in IE you must enable cross domain posts, other browsers?).

3. Using the REST endpoint directly and getting data with an HttpWebRequest in the page code-behind.
- Pros: Can use LINQ to process response; no cross-browser issues.
- Cons: You have to have a code-behind, a server-side page.*

* To be fair, approach 1 requires a code file that implements a session handler for unsecured (non HTTPS) scenarios. See the Messenger Connect JavaScript API post for details on that.

Method 1 is probably going to be what you'll use most of the time, but it is interesting to compare the other approaches. To that end, this post shows an ASPX and code-behind page that shows these three approaches for getting the first five contacts in your contact list. It is built on the Windows Live Application template which can be downloaded here and of course requires that you are registered as a Messenger Connect application. Again, all is explained here.

Update 2011-02-13: Here's a zip of the ASPX and code-behind page.

Without further ado, here's the code (a thorough explanation follows):

The Page Markup


<%@ Page Language="C#" AutoEventWireup="true" CodeBehind="ContactsComparison.aspx.cs"
Inherits="WindowsLiveWebApplicationBeta.ContactsComparison" %>

<%@ Import Namespace="System.Web.Configuration" %>
<!DOCTYPE html PUBLIC "-//W3C//DTD XHTML 1.0 Strict//EN" "http://www.w3.org/TR/xhtml1/DTD/xhtml1-strict.dtd">
<html xmlns="http://www.w3.org/1999/xhtml" xmlns:wl="http://apis.live.net/js/2010">
<head id="Head1" runat="server">
<title>Get Contacts Comparison</title>
<script type="text/javascript" src="http://js.live.net/4.1/loader.js"></script>
<script type="text/javascript" src="http://ajax.microsoft.com/ajax/jquery/jquery-1.4.2.min.js" ></script>
<script type="text/javascript">
var dvContactList;
var dataContext;
var contactsView;
var totalNumContacts;
var displayNumContacts = 5;
var cid;
var accessToken;
var uriContactGet = "http://apis.live.net/V4.1/cid-{0}/Contacts/AllContacts";
jQuery.noConflict();
function appLoaded(applicationLoadCompletedEventArgs) {
}

function SignedOutCallback() {
}
function SignedInCallback(signInCompletedEventArgs) {
if (signInCompletedEventArgs.get_resultCode() !== Microsoft.Live.AsyncResultCode.success) {
log("Failed to sign in: " + signInCompletedEventArgs.get_resultCode());
return;
}
else {
auth = Microsoft.Live.App.get_auth();
accessToken = auth.get_accessToken();
cid = auth.get_cid();
}
}
// *** Using JavaScript API *** //
function getContactsUsingAPI() {
if (Microsoft.Live.App.get_auth().get_state() === Microsoft.Live.AuthState.authenticated) {
dataContext = Microsoft.Live.App.get_dataContext();
dataContext.loadAll(Microsoft.Live.DataType.contacts, contactsLoaded);
}
else {
log("Failed to get contacts using API. Are you authenticated?");
}
}
function contactsLoaded(dataLoadCompletedEventArgs) {
if (dataLoadCompletedEventArgs.get_resultCode() !== Microsoft.Live.AsyncResultCode.success) {
alert("Contacts failed to load...!");
return;
}

contactsCollection = dataLoadCompletedEventArgs.get_data();
totalNumContacts = contactsCollection.items.length;
for (var i = 0; i < Math.min(totalNumContacts, displayNumContacts); i++) {
var contact = contactsCollection.getItem(i);
addItemToList("ContactsAPI", contact.get_firstName() + " " + contact.get_lastName());
}

}
// *** Using REST with jQuery *** //
function getContactsUsingJQuery() {
if (Microsoft.Live.App.get_auth().get_state() === Microsoft.Live.AuthState.authenticated) {
try {
jQuery.ajax({
url: uriContactGet.replace('{0}', cid) + "?$top=" + displayNumContacts,
type: "GET",
async: true,
beforeSend: function (xhr) {
xhr.setRequestHeader("Authorization", "WRAP access_token=" + accessToken);
xhr.setRequestHeader("Content-Type", "application/json");
xhr.setRequestHeader("Accept", "application/json");
},
success: function (data, status, xhr) {
var contactsCollection = data.Entries;
for (var i = 0; i < Math.min(contactsCollection.length, displayNumContacts); i++) {
if (contactsCollection[i] !== undefined) {
var contact = contactsCollection[i];
addItemToList("ContactsRESTJQuery", contact.FirstName + " " + contact.LastName);
}
}
},
complete: function (xhr, status) {
var response = status "no response text";
log("Ajax request completed with " + response + ".");
},
ajaxError: function (data) {
var response = data "no response text";
log("Failure: " + response);
},
error: function (xhr, status, err) { log('Exception: ' + status + ', status = ' + xhr.status + ', message = ' + xhr.statusText); }
});
}
catch (err) {
log("Could not complete a status request. Is cross domain access enabled? Message = " + err);
}
}
else {
log("Failed to get contacts using jQuery Ajax call. Are you authenticated?");
}
}
function addItemToList(parent, item) {
$get(parent).innerHTML += "<li>" + item + "</li>";
}
function log(msg) {
$get('Output').innerHTML += msg + ";";
}

</script>
<style type="text/css">
div.left { float: left; width: 300px; border: 1px solid blue; min-height: 250px; padding: 5px;}
div.output {clear: both;}
ul { list-style-type: none;}
</style>
</head>
<body>
<wl:app
channel-url="<%=WebConfigurationManager.AppSettings["wl_wrap_channel_url"]%>"
callback-url="<%=WebConfigurationManager.AppSettings["wl_wrap_client_callback"]%>?<%=SessionId%>"
client-id="<%=WebConfigurationManager.AppSettings["wl_wrap_client_id"]%>"
scope="WL_Contacts.View, WL_Profiles.View"
onload="appLoaded">
</wl:app>
<form id="form1" runat="server">
<div>
<h1>
Getting Contacts - Comparing Three Different Approaches</h1>
<wl:signin onsignin="SignedInCallback" onsignout="SignedOutCallback" signedouttext="Sign In To Authenticate and Begin">
</wl:signin>
<div class="left">
<h4>Using the JavaScript API.</h4> <input type="button" value="Fetch" onclick="getContactsUsingAPI()" />
<ul id="ContactsAPI">
</ul>
</div>
<div class="left">
<h4>Using REST with jQuery Ajax request.</h4> <input type="button" value="Fetch" onclick="getContactsUsingJQuery()" />
<ul id="ContactsRESTJQuery">
</ul>
</div>
<div class="left">
<h4>Using REST with C# HttpWebRequest.</h4> <asp:Button ID="GetContactsButton"
runat="server" Text="Fetch" onclick="GetContactsButton_Click" />
<ul id="ContactsRESTCodeBehind" runat="server">
</ul>
</div>
<div class="output"><span id="Output" runat="server" /></div>
</div>
</form>
</body>
</html>


The Page Code-Behind

using System;
using System.Collections.Generic;
using System.Linq;
using System.Web;
using System.Web.UI;
using System.Web.UI.WebControls;
// Additional using statements.
using System.Net;
using System.Web.Configuration;
using System.IO;
using Microsoft.Live;
using System.Xml.Linq;

namespace WindowsLiveWebApplicationBeta
{
public class AuthStoreProvider : Microsoft.Live.IAuthStoreProvider
{
public void StoreToken(HttpContext context, string userId, IDictionary<string, string> authInfo)
{
// Get and store the AccessToken.
AccessToken = authInfo["AccessToken"];
CID = authInfo["UID"];
}
public static string AccessToken { get; set; }
public static string CID { get; set; }
}
public partial class ContactsComparison : System.Web.UI.Page
{
public string SessionId
{
get
{
SessionIdProvider oauth = new SessionIdProvider();
return "wl_session_id=" + oauth.GetSessionId(HttpContext.Current);
}
}

protected void Page_Load(object sender, EventArgs e)
{

}

string baseApplicationsEndpoint = "http://apis.live.net/V4.0/cid-{0}/Contacts/AllContacts";
string ApplicationsEndpoint = "";
string MaxNumToDisplay = "5";
string br = "<>";

// *** Using REST with HttpWebRequest *** //
protected void GetContactsButton_Click(object sender, EventArgs e)
{
ApplicationsEndpoint = baseApplicationsEndpoint.Replace("{0}", AuthStoreProvider.CID) + "?$top=" + MaxNumToDisplay;
try
{
// Initialize a request and define its characteristics.
HttpWebRequest request = (HttpWebRequest)WebRequest.Create(ApplicationsEndpoint);

request.Method = "GET";
request.Accept = "application/atom+xml";
request.ContentType = "application/atom+xml";

// Get the AccessToken stored when the user signed in.
request.Headers.Add("Authorization", "WRAP access_token=" + AuthStoreProvider.AccessToken);

// Get the client Id from the web.config.
request.Headers.Add("X-HTTP-LiveFX-ApplicationId", WebConfigurationManager.AppSettings["wl_wrap_client_id"]);

// Send the request and get the response.
HttpWebResponse response = (HttpWebResponse)request.GetResponse();

Stream responseStream = response.GetResponseStream();
StreamReader streamReader = new StreamReader(responseStream);

string responseText = streamReader.ReadToEnd();

CreateContactList(responseText);

streamReader.Close();
responseStream.Close();
}
catch (WebException Ex) // Catch is reached when the request is not successful.
{
HttpWebResponse response = (HttpWebResponse)Ex.Response;

Stream responseStream = response.GetResponseStream();
StreamReader streamReader = new StreamReader(responseStream);

string errorText = streamReader.ReadToEnd();
Output.InnerHtml += errorText;
Output.InnerHtml += br;
Output.InnerHtml += "Access Token = " + AuthStoreProvider.AccessToken + br;
Output.InnerHtml += "CID = " + AuthStoreProvider.CID + br;

streamReader.Close();
response.Close();
}
}
protected void CreateContactList(string input)
{
XNamespace ns = "http://www.w3.org/2005/Atom";
XNamespace nsp3 = "http://schemas.microsoft.com/ado/2007/08/dataservices"; // p3
TextReader tr = new StringReader(input);
XDocument xdoc = XDocument.Load(tr);
var contentQuery = from entry in xdoc.Descendants(ns + "content")
select entry;

foreach (XElement contentElement in contentQuery)
{
string firstName = contentElement.Descendants(nsp3 + "FirstName").FirstOrDefault().Value;
string lastName = contentElement.Descendants(nsp3 + "LastName").FirstOrDefault().Value;
ContactsRESTCodeBehind.InnerHtml += "<li>" + firstName + " " + lastName + "</li>";
}
}
}
}


Web.config key

<add key="wl_wrap_store_provider_type"
value="WindowsLiveWebApplicationBeta.AuthStoreProvider,WindowsLiveWebApplicationBeta"/>


Explanation of the code:

  1. Approach 1 (Javascript API) is all based off the loader (http://js.live.net/4.1/loader.js) which figures out what is needed for your page and enables you to work with a data context, ask for resources through the data context, and then work with the returned resource collection. Behind the scenes it is using the REST endpoints similarly to what is done in Approach 2 and 3.
  2. Approach 2 (REST with jQuery) depends on an endpoint for the resource you are interested in (e.g. http://apis.live.net/V4.1/cid-{0}/Contacts/AllContacts). The {0} value is replaced with the unique ID of the authenticated user Windows Live User. How is this endpoint URI known? You can figure it out from using the Windows Live Rest Explorer or you can look in the documentation, for example, for the AllContacts collection documentation page.
  3. Approach 2 requires the access token to be sent as a header as part of the AJAX request. The access token can be obtained from the Auth class.
  4. Approach 3 (REST in code-behind) also depends on an endpont for the resource. In this example it's defined in the code-behind similarly to Approach 2.
  5. Approach 3 as well depends on putting the access token into the request header. It's a bit more complicated in this case because you need to define a class (AuthStoreProvider in this code exampled) to implement the IAuthStoreProvider interface and get access to the access token. Finally, you need to make sure you hook up your AuthStoreProvider with an app key in the web.config file shown above.

A screenshot of the resulting page is at the beginning of this post. No surprises, each approach returns the same data! For more information on using LINQ with the Atom feed see this post. Finally, if you are using this in a web farm scenario you might consider storing the access token and cid in a cookie instead of using a static as shown here.

Sunday, September 12, 2010

La Sirena

John William Waterhouse - A Mermaid (1901)

La sirena (‘The Siren") is story by Giuseppe Tomasi di Lampedusa (1896 – 1957) written in the late 1950s and first published in the early 1960s. Lampedusa is famous for Il gattopardo (‘The Leopard’) in which Burt Lancaster played the leading role in the movie adaptation. (I always thought he learned Italian for the role, but learned recently it was all voice over, doppiaggio as they say.) We are reading La sirena – in Italian, slowly over several weeks - as part of a conversation course at the Seattle Language Academy (SLA).

In the story, we meet a young Sicilian journalist, Paolo Corbèra, living in Turin just before the Second World War. At the beginning of the story Corbèra has a bit of woman trouble, loses two girlfriends in the same day, and exiles himself to a café that is like a purgatory for him. There he meets the eminent classical Greek scholar, Professor Rosario La Ciura. As their friendship develops we learn more about La Ciura and how the titular sirena figures into the story. Along the way, Corbèra takes a lot of good-natured abuse from the professor, but, nonetheless develops a deep affection and reverence for him.

While the sirena of the story translates better to what we call a mermaid (water-based) rather than siren (land-based), the terms have been confused in some European folklore over time and sirena in this case means a siren of Greek mythology that is a mermaid. In the story we learn that sirens have been seriously misunderstood and they don’t really lure sailors to their deaths.

Here’s a favorite part from the beginning of the story where Corbèra first notices La Ciura in the café and describes him:

Aveva bruttissime mani, nocchierute, rossastre con le unghie tagliate dritte e non sempre pulite, ma una volta che in una delle sue riviste s’imbatté nella fotografia d’una statua greca arcaica, di quelle con gli occhi lontani dal naso e col sorriso ambiguo, mi sorpresi vedendo che i suoi deformi polpastrelli accarezzavano l’immagine con una delicatezza addrittura regale.

Our approximate translation: He had ugly, knotty, reddish hands with fingernails cut straight and not always clean, but once, in one of his magazine he came upon a photo of an ancient greek statue, one of those with the eyes set far apart and with an ambiguous smile, and I was surprised to see his deformed fingertips carress the image in a manner that was quite delicate.

Bing translation (for comparison): “Had bruttissime hands, nocchierute, reddish with fingernails cut straight and not always clean, but once in one of his journals s ' came in the photograph of a statue Greek archaic, those with eyes away from nose and col ambiguous, I surprised smile seeing that his deformed pads they embraced the image with a delicate Regal addrittura”

Google translation (for comparison): “He had very bad hands, helmsman, with reddish nails cut straight and not always clean, but once he came in one of his magazines in the photograph of a statue of ancient Greek, those eyes away from his nose and his ambiguous smile I surprised seeing his deformed fingers caressed the image with a royal delicacy addrittura.”

Friday, September 10, 2010

Mount St. Helens Climb

Mount St Helens - About 1000 feet from the top

We’ll come clean right away. We climbed to the rim of Mount St. Helens and saw nothing. It was the weather: foggy with sleet and rain showers. But, we did make it to the top. It was a bit of a slog and our quadriceps were talking to us for days after. We climbed on September 7th, 2010.

The details:

  • Route: Summer route (aka Monitor Ridge) from Climbers’ Bivouac.
  • Length: 10.5 miles round trip.
  • Elevation Gain: 4,615 feet, starting at 3,750 feet and ending at 8,365 feet.
  • Suggested Season for the Hike: Late spring through fall.
  • Difficulty: Very Difficult.
  • Permit: NW Forest Pass Required for parking and a permit to go above 4,800 feet.
  • Our Duration: Started at 6:55am from Climbers’ Bivouac. Reached the summit at 10:15am. Back down and at our car at 1:15pm (includes a 20-30 minute stop for lunch).
The trail is pretty much like everyone describes. You start in forest and then suddenly you break out into this big boulder area (blocky lava flows) and it gets tough quickly and stays that way until you are about 1,500 feet from the top and then the boulders go away and you are in the sandy/pebbly (volcanic ash) terrain which goes straight up. At that point we were taking baby steps. Every step sunk several inches backwards and it felt like we were going nowhere. On the way down you, every steps goes several inches forward and you gain back what you lost as you semi-slide down this part. On our hike we saw snow (Dryer Glacier to one side and Swift Glacier to the other) but never had to walk on it.

The path is marked in the boulder field with large wooden posts. Use them as guideposts but don’t go directly from post to post – unless you want to. The post-to-post approach will wear you out. When you reach one post look to see where the next one is and also look for the footprints of where people have gone as a guide and you’ll see that there is usually a path to get you there. The wooden posts disappear at the last part of the hike and you are on your own as the trail seems faint. Hint: go up!

Planning:
  • The Mount St. Helens National Volcanic Monument site – it has all the information you need. Really read this page and weigh the risks and warnings.
  • You have to get a permit to climb above 4,800 feet on the volcano which can be picked up at the Lone Fir Resort, 16806 Lewis River Road, Cougar, WA. (The permit includes a pass to park at Climbers’ Bivouac.)
  • You should sign in before and after the hike at the Lone Fir Resort. You can sign in up to a day ahead of time – see the link above for details.
  • You should bring versatile gear and expect all kinds of weather. There is a 10 essentials list here.
  • What we brought: everything on the essentials list except a flashlight (we forgot), emergency shelter, and a hard hat. We were happy to have really good rain gear and rain paints. And to have brought warm gloves.
  • We brought a GPS that was handy for telling us elevation, because most of the time we couldn’t see that far ahead and didn’t know how much farther there was to go.
  • We also brought too much food thinking we could ‘picnic’ up at the top. That was clearly not the case for our hike. There really weren’t many ‘picnic’ spots. So perhaps just bring lots of snacks and save the food for the end. We ended up eating on the side of the trail on the way down at the edge of the forest.
  • Nearby lodging: The Lone Fir Resort. We stayed here.

Midway Up Mount St Helens Looking over Swift Glacier
Midway up and looking off over Swift Glacier

Mount St Helens Just Past the Boulders and into the Ash
Trudging up the volcanic ash

Mount St Helens - In the Boulders
Navigating the boulders

Mount St Helens - at the crater rim
At the crater rim, looking left into the crater

Mount St Helens - The Clouds Lift for a Second
The clouds lift for a bit

Thursday, September 9, 2010

Do Not Clean Fish or Other Game Animals in the Room

Fish and Fowl in The Room
On a recent hike to the crater rim of Mount St. Helens we stayed at the Lone Fir Resort in Cougar, WA. This little reminder on the nightstand “Please do not clean fish or other game animals in the room” released flights of fancy of what must have happened to warrant this reminder. Our room smelled fine.

The Lone Fir Resort is close to the starting point (Climbers’ Bivouac) of the summit hike and is where you pick up your permit to climb as well as to sign in and out for the hike. We are going to rate this lodging two bear claws out of four. They do have a good hamburger at the café.