Overview
(This post last reviewed and steps verified October 2015. Note that WebMatrix has been retired since this was written.)Left: Example Web Service Call Data; Right: Enphase Graphic Showing Solar Panel Array
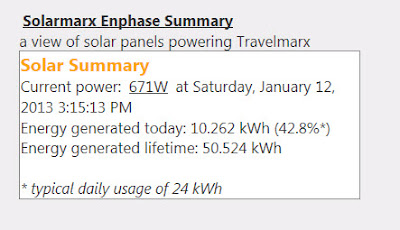
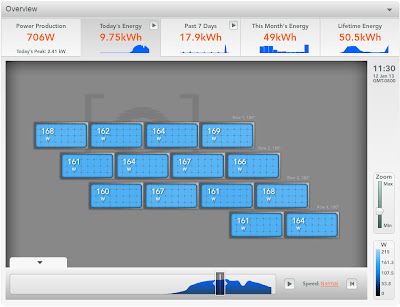
This tutorial discusses a simple approach to working with your Enphase data. Enphase data is data that your solar array sends up into the cloud (Enphase servers) when your system uses the Enphase Envoy Communications Gateway (http://enphase.com/products/envoy/) with your Enphase microinverters. This system allows solar array owners to check the status of their system and view various aspects of the system's performance.
We recently installed 14 solar panels working with Solterra Systems and we were curious about how to access our data. It proved to be fairly straightforward. With a little programming background you can work with the data as you want, for example, exposing it in web pages and applications.
Don’t know or want to do any programming? No worries, you you can still work with your Enphase data in several easy ways:
- Probably the easiest non-programming approach is to just go to the site that Enphase provides for you. (Sites can be made public or remain private.) Enphase provides all sorts of graphs. For example: https://enlighten.enphaseenergy.com/public/systems/zVU7148952
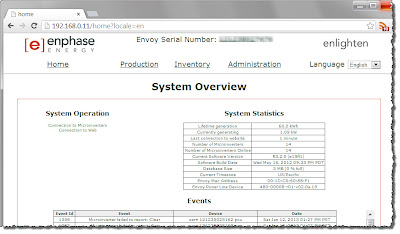
- The next easiest non-programming approach is to log on, locally, to your Enphase Envoy gateway device and view your data. This only works when you are at home, on your own network.
The local site might be something like http://192.168.0.11 and it includes a couple of pages:
Home page - System statistics and events.
Production page - System energy production
Inventory page - list of solar array panels (at least for us).
Administration page
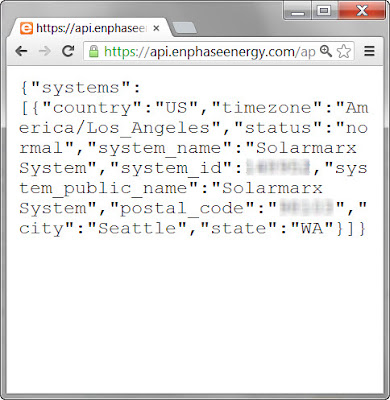
It seems strange to have data about something physically near us pump its data out to the Internet where we then access back through the Internet. Why do we do this? Because the local data isn't easily consumable in any practical form other than viewing it in a browser. What we want are numbers we can manipulate and display as we want. - A third non-programming approach is to get an API key as shown in Step 1 below and within a few moments you can create a URL that you can use in a browser to return data. It is pretty low tech, but it works wherever you are. Here’s an example of an URL: https://api.enphaseenergy.com/api/systems?key=<YOUR_KEY_HERE>. More examples are shown in Step 2 below.
Before we start in with the tasks, let's list the software components and hardware components we are using in the tutorial.
Software Components
A Web service built with C# and a simple web page to display the results from that web service. Both are running in a free Windows Azure web instance.- Why a web service? We can hide our Enphase API key and the web service is easy to create and use. You can have code for retrying or aggregation of different streams of data. Also, the web service can be leveraged from other clients (applications on other devices).
- Why Windows Azure? Because we have a number of other projects hosted there and it made sense. They offer a free web site solution that is easy to use.
- Is a hosting solution like Windows Azure necessary? No you can host the web service and web page on your local computer and it would work fine. We wanted to host the service in the Cloud so we could access it remotely.
- What operating systems did we use for this tutorial? Development was done on both Windows 7 and Windows 8.
- Why? It’s easy to use jQuery in a web page to call the web service we created and put the data on a web page.
- Why? Free and relatively easy to use tools for creating web sites. The web sites can be used locally only and also published to a remote web site.
- Why? Well, because this API provides the access to the data about our system. Thankfully, it is a fairly simple API to use with query strings that require your “key”. With each “call” to the API you can get different types of data back.
Sample code files for this blog post can be downloaded from Github.
Hardware Components
Enphase Envoy Comunications Gateway
- The Enphase Envoy Comunications Gateway connects to a router (https://enphase.com/en-us/products-and-services/envoy) which talks to the Enphase web service. The Envoy in turn communicates with the micro-inverters that convert DC to AC, one for each solar panel.
- Our solar array consists of 14 panels on our roof. Each panel is a 255 W, SolarWorld, mono-crystalline, 60 cell solar panel. Here is a summary: https://enlighten.enphaseenergy.com/public/systems/zVU7148952
- The solar panels were designed and installed by Solterra Systems.
Step 1: Get Your Enphase API key.
Step 2: Get Familiar with Getting Enphase Data Using the API
Step 3: Set Up a Free Azure Web Site
Step 4: Create a Simple Web Service to Get and Display Enphase Data
Step 1: Get an Enphase API Key
Go to https://developer.enphase.com/docs/quickstart.html and follow the instructions.
Step 2: Get Familiar with Enphase Data Using the API
The root URL for the API is http://api.enphaseenergy.com/api/. Assuming you have your API key, you can easily test the API calls in a browser. Note that some browsers show the returned JSON by default, other browsers might force you to open the file in another application (you can choose any program that can display text).
Your API key is 32 characters long. For the sample URLs here we’ll use the example key = “11112222333344441111222233334444”. Other data below is displayed with XXXXXX to hide our system ID (different from the ID used in the public system URL above). Your system will show the appropriate data for your setup.
API: Get System Info
Example Input
https://api.enphaseenergy.com/api/v2/systems?key=11112222333344441111222233334444
Example Output
{"systems":[{"country":"US","timezone":"America/Los_Angeles","state":"WA","system_public_name":"Solarmarx System","status":"normal","postal_code":"XXXXXX","city":"Seattle","system_id":XXXXXX,"system_name":"Solarmarx System"}]}API: Get Lifetime Energy
Example Input
https://api.enphaseenergy.com/api/v2/systems/XXXXXX/energy_lifetime?key=11112222333344441111222233334444
Example Output
{"production":[144,1390,8738,9344,9205],"start_date":"2012-12-30T00:00:00-08:00","system_id":XXXXXX}API: Get Power Today
Example Input
https://api.enphaseenergy.com/api/v2/systems/XXXXXX/summary?key=11112222333344441111222233334444Example Output
{"system_id":148952,"total_devices":14,"intervals":[{"end_at":1445784600,"devices_reporting":1,"powr":4,"enwh":0},{"end_at":1445784900,"devices_reporting":1,"powr":30,"enwh":3},....
{"end_at":1445815500,"devices_reporting":1,"powr":30,"enwh":3},{"end_at":1445815800,"devices_reporting":1,"powr":30,"enwh":3}]}
Notes
There are as many items in the list as there are 5 minute intervals in the day. For example, for a day with 8 hours and 45 minutes of daylight, that's 525 minutes of daylight and 105 intervals. For more information, see the stats call.
Get Summary
Example Input
https://api.enphaseenergy.com/api/v2/systems/XXXXXX/summary?key=11112222333344441111222233334444Example Output
{"current_power":0,"energy_month":27287,"modules":14,"summary_date":"2013-01-04T00:00:00-08:00","source":"microinverters","energy_today":3773,"energy_lifetime":28821,"system_id":XXXXXX,"energy_week":28821}Notes
Specify summary_date for a specific day.https://api.enphaseenergy.com/api/systems/XXXXXX/summary?summary_date=2013-01-02&key=11112222333344441111222233334444
Step 3: Setting up a Free Azure Web Site
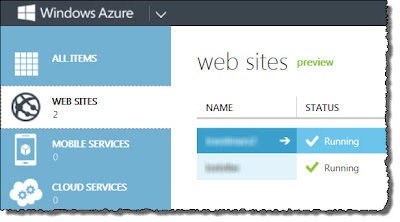
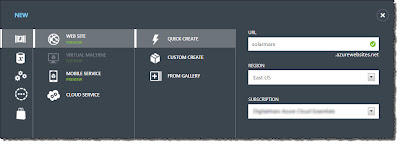
All the code shown in this step and the next (Step 4) will run locally and don’t require a remote web site. If you you only want to experiment with a local web site (on your computer), just skip the tasks that talk about creating a Azure web site and publishing remotely.Step 3.1: Go to https://manage.windowsazure.com, create the site and download the publishing settings for the site.
- Assuming you already have an account established, you will create a free Azure web instance. In the Windows Azure Free instance, your web site runs in a multi-tenant environment, that is, you share resources. This is fine for what we are doing here.
- We call the site in this tutorial “solarmarx” which gets the domain name http://solarmarx.azurewebsites.net. Call your site something appropriate for your situation. If you wanted to have a custom domain (like www.mycustomdomain.com), you can do that as an extra step.
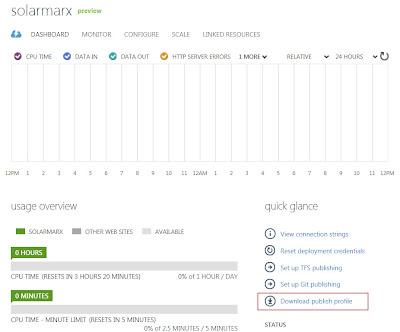
- After you create the site, download the publishing settings which are used to tell you local programs (WebMatrix and Visual Studio Express) how to publish to the remote web site (in the Cloud).
- Create a site using WebMatrix or Visual Studio. Create an empty site then associate the site with the publishing settings. You can also create an fully functional local site first and and test it locally and then later associate the publishing profile.
- For example, edit the title of the Default.cshtml document and put some text in the body of the HTML file.
<!DOCTYPE html> <html lang="en"> <head> <meta charset="utf-8" /> <title>Solarmarx</title> <link href="~/favicon.ico" rel="shortcut icon" type="image/x-icon" /> </head> <body> <p>Welcome to Solarmarx!</p> </body> </html> - Select the Default.cshtml, right-click, and select Publish.
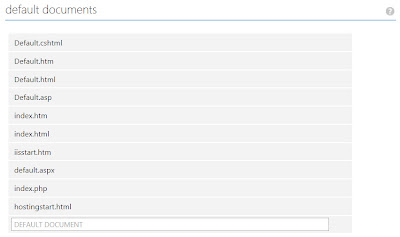
Step 3.4: In the Azure Management Portal for the web site, make sure Default.cshtml is one of the default document types for the web site.
- Go to the Configure page of the web site and look for the default documents section.
- Add Default.cshtml as a document type.
Left: Windows Azure Web Sites View, Right: Windows Azure – Creating a Web Site
Left: Windows Azure Download Publishing Profile; Right: Setting Default Documents
Step 4: Create a Simple Web Service and Display Information
In this step of the tutorial, we show using Visual Studio Express 2012. You could also do the same work in WebMatrix2. You have several options for working with the web site you created. To open the site in Visual Studio Express 2012, use "Open Web Site" and find the Local IIS web site "Solarmarx" in our case.
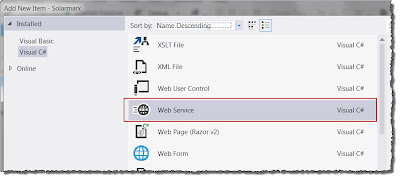
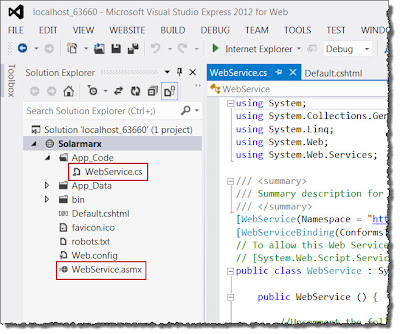
Step 4.1: Create a web service by create a new .asmx file.
Left: Create a new Web Service; Right: What Gets Created
Step 4.2: Put the code into the WebService.cs file as shown below. Below, an example key (11112222333344441111222233334444) is used. As well XXXXXX is used as the system ID. Fill in the correct values for your system.
using System;
using System.IO;
using System.Net;
using System.Text;
using System.Web.Services;

[WebService(Namespace = "http://solarmarx.com/")]
[WebServiceBinding(ConformsTo = WsiProfiles.BasicProfile1_1)]
// To allow this Web Service to be called from script, using ASP.NET AJAX, uncomment the following line.
[System.Web.Script.Services.ScriptService]
public class WebService : System.Web.Services.WebService {

    public WebService () {

        //Uncomment the following line if using designed components
        //InitializeComponent();
    }

    [WebMethod]
    public string HelloWorld() {
        return "Hello World";
    }

    [WebMethod]
    public string GetEnphaseStats()
    {
        String key = "11112222333344441111222233334444";
        String uri = "https://api.enphaseenergy.com/api/systems/XXXXXX/summary?key=" + key;
        WebRequest wrGETURL = WebRequest.Create(uri);

        Stream objStream = wrGETURL.GetResponse().GetResponseStream();

        StreamReader objReader = new StreamReader(objStream);

        StringBuilder sb = new StringBuilder();
        String sLine = "";

        while (sLine != null)
        {
            sLine = objReader.ReadLine();
            if (sLine != null)
                sb.Append(sLine);
        }
        return sb.ToString();
    }

}
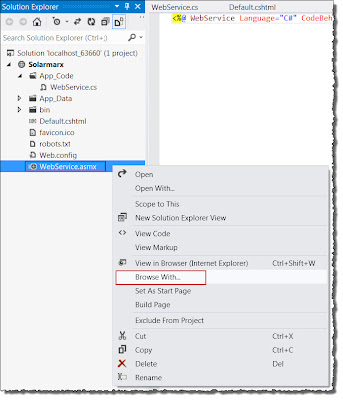
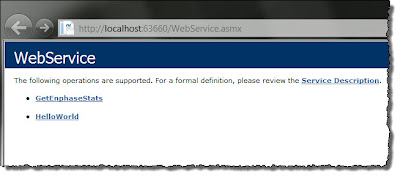
Step 4.3: Test the web service locally (on your computer) by selecting the WebService.asmx and browsing.
Left: Browsing a Web Service Locally; Right: The Service Operations
Step 4.4: Create a basic web page that uses jQuery.
<!DOCTYPE html>
<html lang="en">
    <head>
        <meta charset="utf-8" />
        <title>Solarmarx</title>
        <link href="~/favicon.ico" rel="shortcut icon" type="image/x-icon" />
        <script src="~/Scripts/jquery-1.8.3.min.js"></script>
        <script>
            $(document).ready(function () {
                alert('jQuery installed.');
            });
        </script>
    </head>
    <body>
        <p>Welcome to Solarmarx!</p>
    </body>
</html>
- Install jQuery in a \Scripts folder. You can use the NuGet service to do that.
- Test that you have installed jQuery correctly by making the changes shown above and viewing the Default.cshtml page
Step 4.5: Modify the web page as shown below to add script that calls the web service and puts the results in an HTML element on the page.
<!DOCTYPE html>
<html lang="en">
    <head>
        <meta charset="utf-8" />
        <title>Solarmarx</title>
        <link href="~/favicon.ico" rel="shortcut icon" type="image/x-icon" />
        <script src="~/Scripts/jquery-1.8.3.min.js"></script>
        <script>
            var webservicePath = "/WebService.asmx/";
            var pubLink = "https://enlighten.enphaseenergy.com/public/systems/zVU7148952";

            $(document).ready(function () {
                $.ajax({
                    type: "POST",
                    url: webservicePath + "GetEnphaseStats",
                    success: function (results) {
                        var res = jQuery.parseJSON($(results).text());
                        var avg_use = 24; // kWh per day
                        var d = new Date().toLocaleString();
                        var current_power = res.current_power;
                        var energy_today = res.energy_today / 1000;
                        var energy_lifetime = res.energy_lifetime / 1000;
                        var energy_today_perc = 100 * (energy_today / 24);
                        var summaryElement = $("<span id=\"enphaseTitle\">Solar Summary</span> <br/>" +
                                                "<span> Current power: <a target=\"_blank\" href=\"" + pubLink + "\">" + current_power + "W</a> at " + d + "</span > <br/>" +
                                                "<span> Energy generated today: " + energy_today + " kWh (" + energy_today_perc.toFixed(1) + "%*)</span> <br/>" +
                                                "<span> Energy generated lifetime: " + energy_lifetime + " kWh</span> <br/>" +
                                                "<br/><span id=\"note\">* typical daily usage of 24 kWh</span>");
                        $("#enphaseStats").append(summaryElement);
                    },
                    error: function (result) {
                        alert(result.responseText);
                    }
                });
            });
    </script>
    </head>
    <body>
        <p>Welcome to Solarmarx!</p>
        <!-- data from webs service call goes here -->
        <div id="enphaseStats">
        </div>
    </body>
</html>
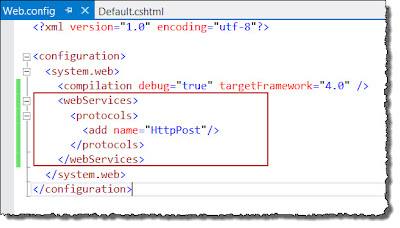
Step 5.5: If publishing remotely, you need to set configure HttpPost as a service that can be used. This is done in the web.config file.
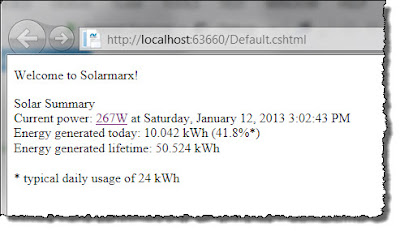
Step 5.6: Test locally, publish to the cloud (if you created a remote site), and test remotely.
Just to let you know, I appreciate all the details you provided in this write up. I know it took a lot of time to write up how to do it in such details with all the sample code blocks
ReplyDeleteThanks