Example of Extracting Comments From a Microsoft Word Document

Overview
This post shows one way to grab all the comments from a Microsoft Word document and display them as HTML. We last tested this August 2021 with the latest version of Microsoft Word.
The method shown here leverages the fact that, starting with Word 2007, documents are zipped packages of XML files and associated resources that can be "cracked" open simply by changing the extension from .docx to .zip. This capability is part of the
Office Open XML standard,
ECMA-376. In other words, a Word document is really a ZIP package that inside contains a virtual directory structure with XML files and resources (like images) that comprise the document. The package concept as described on
MSDN is analogous to a filing cabinet. There is a good tutorial on the open format on this
Office training page. The ZIP-like behavior applies to more than just the Word format we are dealing with here. It applies to Excel spreadsheets (.xlsx), PowerPoint presentations (.pptx) and XPS documents (.xps).
We thought this was kind of interesting when we first learned about it and thought about a way to exploit this format. What we came up with is a scenario when you want to get the comments out of a document, which turns out to be common. With that in mind, let's begin.
The steps
Suppose you have the document "Software Spec.docx" that has comments in it with at most hyperlinks in them and you want to extract all the comments and hyperlinks. First we'll need to get at the comments stored as an XML file inside the package. To do this, add the extension .zip to the file name and then unzip the file so that you end up with a directory looking like this:
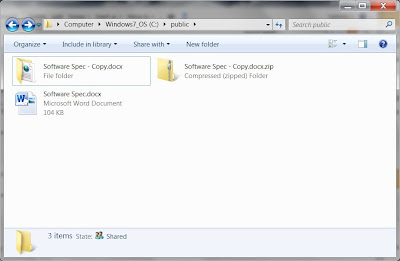
If you go into the unzipped folder you are at the
top level folder:
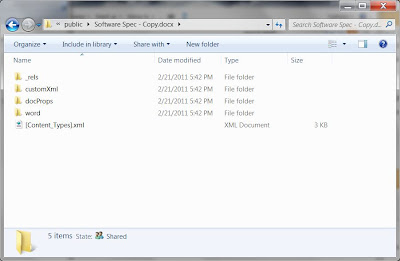
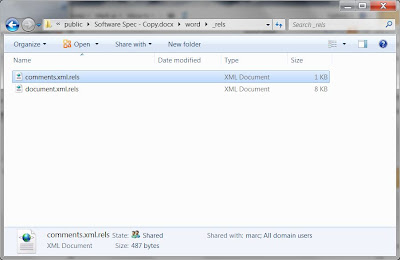
If you go into the
word directory, you should see something that looks like the following image:
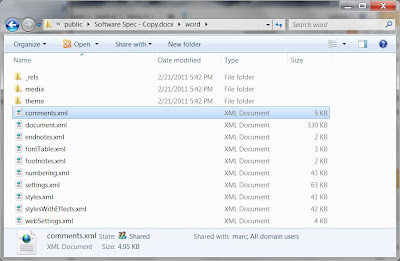
This contains the file
comments.xml that has the comments in it. But we are also considering that the comments have hyperlinks in them, so we need to go even further and go into the
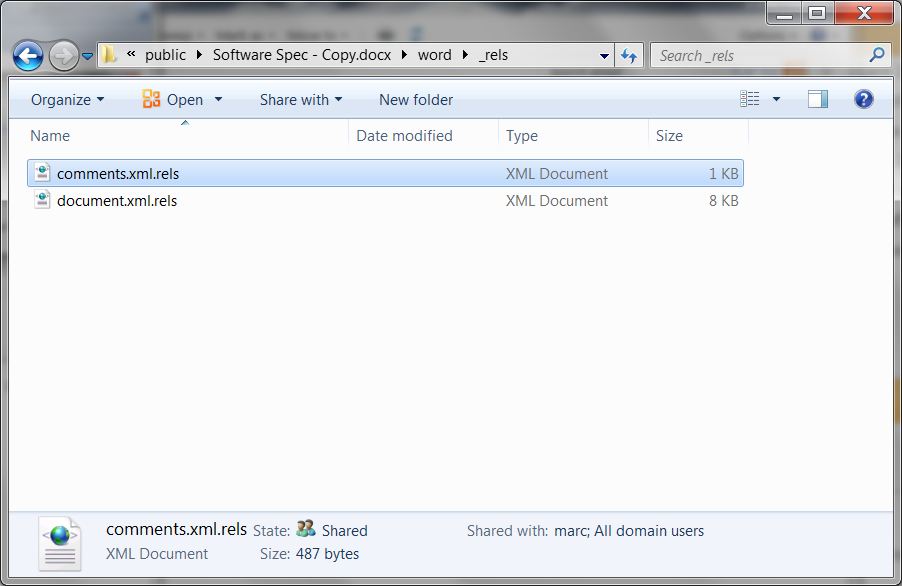
_rels folder.
In the
_rels folder there is a
comments.xml.rels file that contains the hyperlinks that are used in the comments. Together the
comments.xml and the
comments.xml.rels can be used to get what we want. (If you don't have a
comments.xml.rels it means your comments don't have any hyperlinks in them. See step 2 below for more information)
To get the comments out we'll use an XSL transform on the two XML comment files to transform XML to HTML. So the basic strategy is this :
1. Take the
comments.xml as is and place in a directory (we'll call it the
transform directory) where we'll do the transformation. A different
transform directory than the unzipped folder is best to avoid confusion.
2. In the
transform directory, also put the
comments.xml.rels file.
If you don't have a comments.xml.rels file, it means the comments in your Word doc don't have any hyperlinks. If this is the case, create an empty comments.xml.rels file. Technically, this isn't really necessary, you can leave out the file and the transform will fail gracefully.
3. In the
transform directory, create a
transform.xslt file and put the content shown below in the
code section in it.
4. In the
transform directory, create a
stylesheet.css file and put the content shown below in it. This is optional, but makes the output look nicer. The transform uses speech bubbles to display comments, an idea that comes from
http://nicolasgallagher.com/pure-css-speech-bubbles/.
5. Finally, in the
comments.xml file, add the line that references the
transform.xslt file. This additional line will be the second line in your file. (See full file example in
code section below.)
<?xml-stylesheet type="text/xsl" href="transform.xslt"?>
6. See the comments with transformation and stylesheet applied. Once upon a time, you could just open the
comments.xml file in a browser and the comments would be transformed. Over time, security made this trickier and rightly so. If you are a developer, you probably have your favorite way to transform the XML to HTML, like using Visual Studio. The easiest way we found to do is as follows:
a. Be sure all Edge browser windows are closed and start a new version with:
Windows Key W + R
msedge --allow-file-access-from-files
b. Or, if you work in Chrome, close all Chrome browser windows and start a new version with:
Windows Key W+ R
chrome --allow-file-access-from-files
c. Drag the comments.xml into the new browser window and the browser should transform the XML for you.
d. Kill the browser started because you should only use it for this test.

Extending the transform
Above we specified that we were dealing with comments with hyperlinks. But, more generally, comments in a Word file can have images, SmartArt and a lot more. To make the comment extraction method given here more robust you would need to modify the XSLT to take all this into account. For example, if you inserted a SmartArt Graphic into a comment, the
word\comments.xml file would reference a relationship in the
word\_rels\comments.xml.rels file which would reference
word\diagrams\data1.xml (for example) that might in turn reference another file
\word\diagrams\drawing1.xml (for example). The point is, it can get quite complicated and all the paths need to be followed to reconstruct the comments as they appear in the document.
Note that we have to deal with two XML files,
comments.xml and
comments.xml.rels, with one transform. We do this by using the XSLT
document function. Notice in the
transform.xlst there is this line:
<xsl:variable name="rels" select="document('comments.xml.rels')"/>
Full code examples
Example
comments.xml file (a snippet):
<?xml version="1.0" encoding="UTF-8" standalone="yes"?>
<?xml-stylesheet type="text/xsl" href="transform.xslt"?>
<w:comments xmlns:wpc="http://schemas.microsoft.com/office/word/2010/wordprocessingCanvas"
           xmlns:mc="http://schemas.openxmlformats.org/markup-compatibility/2006"
           xmlns:o="urn:schemas-microsoft-com:office:office"
           xmlns:r="http://schemas.openxmlformats.org/officeDocument/2006/relationships"
           xmlns:m="http://schemas.openxmlformats.org/officeDocument/2006/math"
           xmlns:v="urn:schemas-microsoft-com:vml"
           xmlns:wp14="http://schemas.microsoft.com/office/word/2010/wordprocessingDrawing"
           xmlns:wp="http://schemas.openxmlformats.org/drawingml/2006/wordprocessingDrawing"
           xmlns:w10="urn:schemas-microsoft-com:office:word"
           xmlns:w="http://schemas.openxmlformats.org/wordprocessingml/2006/main"
           xmlns:w14="http://schemas.microsoft.com/office/word/2010/wordml"
           xmlns:wpg="http://schemas.microsoft.com/office/word/2010/wordprocessingGroup"
           xmlns:wpi="http://schemas.microsoft.com/office/word/2010/wordprocessingInk"
           xmlns:wne="http://schemas.microsoft.com/office/word/2006/wordml"
           xmlns:wps="http://schemas.microsoft.com/office/word/2010/wordprocessingShape" mc:Ignorable="w14 wp14">
   <w:comment w:id="8" w:author="Arthur Smash" w:date="2011-02-21T13:10:00Z" w:initials="AS">
       <w:p w14:paraId="522F5EC4" w14:textId="77777777" w:rsidR="00C60769" w:rsidRDefault="00C60769">
           <w:pPr>
               <w:pStyle w:val="CommentText"/>
           </w:pPr>
           <w:r>
               <w:rPr>
                   <w:rStyle w:val="CommentReference"/>
               </w:rPr>
               <w:annotationRef/>
           </w:r>
           <w:r>
               <w:t>We need to add more to this section so readers know what is going on here.</w:t>
           </w:r>
       </w:p>
       <w:p w14:paraId="5E190A2F" w14:textId="77777777" w:rsidR="00C60769" w:rsidRDefault="00C60769">
           <w:pPr>
               <w:pStyle w:val="CommentText"/>
           </w:pPr>
       </w:p>
       <w:p w14:paraId="632FBBEE" w14:textId="01A8A8C9" w:rsidR="00C60769" w:rsidRDefault="00C60769">
           <w:pPr>
               <w:pStyle w:val="CommentText"/>
           </w:pPr>
           <w:r>
               <w:t xml:space="preserve"> For background reading see the one page spec I put together last week.</w:t>
           </w:r>
       </w:p>
   </w:comment>
The
transform.xslt file (downloadable version is
here):
<?xml version="1.0" encoding="utf-8"?>
<xsl:stylesheet version="1.0" xmlns:xsl="http://www.w3.org/1999/XSL/Transform"
               xmlns:msxsl="urn:schemas-microsoft-com:xslt"
               xmlns:w="http://schemas.openxmlformats.org/wordprocessingml/2006/main"
               xmlns:r="http://schemas.openxmlformats.org/officeDocument/2006/relationships"
               exclude-result-prefixes="msxsl">
   <xsl:variable name="rels" select="document('comments.xml.rels')"/>
   <xsl:output method="html" doctype-public="html"/>
   <xsl:template match="w:comments">
       <html lang="en">
           <head>
               <title>Comments from Word</title>
               <link href="stylesheet.css" rel="stylesheet" type="text/css" />
           </head>
           <body>
               <xsl:for-each select="w:comment">
                   <div>
                       <i>
                           <xsl:value-of select="@w:author"/>
                       </i> on
                       <i>
                           <xsl:value-of select="@w:date"/>
                       </i> said
                   </div>
                   <div class="triangle-isosceles top">
                       <xsl:for-each select="w:p">
                           <p>
                               <xsl:for-each select="child::node()">
                                   <xsl:choose>
                                       <xsl:when test="name()='w:hyperlink'">
                                           <xsl:variable name="cId" select="@r:id"/>
                                           <xsl:variable name="link" select="$rels//*[@Id=$cId]/@Target"/>
                                           <a href="{$link}">
                                               <xsl:value-of select="./w:r"/>
                                           </a>
                                       </xsl:when>
                                       <xsl:when test="name()='w:r'">
                                           <xsl:value-of select="."/>
                                       </xsl:when>
                                   </xsl:choose>
                               </xsl:for-each>
                           </p>
                       </xsl:for-each>
                   </div>
                   <xsl:if test="position() != last()">
                   </xsl:if>
               </xsl:for-each>
           </body>
       </html>
   </xsl:template>
</xsl:stylesheet>
The
stylesheet.css file (optional, downloadable version is
here):
body
{
   font-family: Verdana;
}

.triangle-isosceles
{
   position: relative;
   padding: 15px;
   margin: 1em 0 3em;
   color: #000;
   background: #f3961c; /* default background for browsers without gradient support */ /* css3 */
   -moz-border-radius: 10px;
   -webkit-border-radius: 10px;
   border-radius: 10px; /* NOTE: webkit gradient implementation is not as per spec */
   background: -webkit-gradient(linear, left top, left bottom, from(#f9d835), to(#f3961c));
   background: -moz-linear-gradient(top, #f9d835, #f3961c);
   background: -o-linear-gradient(top, #f9d835, #f3961c);
}
.triangle-isosceles.top
{
   /* NOTE: webkit gradient implementation is not as per spec */
   background: -webkit-gradient(linear, left top, left bottom, from(#f3961c), to(#f9d835));
   background: -moz-linear-gradient(top, #f3961c, #f9d835);
   background: -o-linear-gradient(top, #f3961c, #f9d835);
}
.triangle-isosceles:after
{
   content: "";
   display: block; /* reduce the damage in FF3.0 */
   position: absolute;
   bottom: -15px; /* value = - border-top-width - border-bottom-width */
   left: 50px; /* controls horizontal position */
   width: 0;
   height: 0;
   border-width: 15px 15px 0; /* vary these values to change the angle of the vertex */
   border-style: solid;
   border-color: #f3961c transparent;
}

.triangle-isosceles.top:after
{
   top: -15px; /* value = - border-top-width - border-bottom-width */
   left: 50px; /* controls horizontal position */
   bottom: auto;
   left: auto;
   border-width: 0 15px 15px; /* vary these values to change the angle of the vertex */
   border-color: #f3961c transparent;
}
A
subsequent post describes a C++ program to get comments.