Pages

Wednesday, August 29, 2012

How to Open a Young Coconut

In a previous post we talked about young coconuts and opening them up. In this post, we show in words and pictures a simple technique to open a young coconut.

Step 1: Wash the outside of the plastic or place paper towel down on your cutting board underneath the coconut. We have recently started to keep the plastic on because who knows where the plastic has been and in the previous post, we talked about reasons why you might want to leave the plastic on.
Step 1: Wash the outside of the coconut

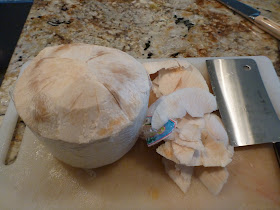
Step 2: Shave off the top third of the husk until you reach the shell. We usually use a cleaver, always striking in a motion away from the hand holding the coconut.
Step 2: Shave off the top third of the husk of the coconut

Step 3: Locate the seams that make three wedges on the part of the coconut you just shaved (really the bottom of the coconut). Locate the largest wedge. This is where you are going to strike the coconut.
Step 3: Locate the seams that make three wedges

Step 4: Strike at the largest wedge an inch or two from the top. One sharp blow should be enough with the heel of the cleaver.
Step 4: Strike at the largest wedge

Step 5: Work the cleaver underneath the cap and pop it off.
Step 5: Work the cleaver underneath the cap and pop it off

Step 6: Pour out the coconut milk and then scoop out the pulp. Remove plastic and recycle coconut husk.

Addendum 09-29-2012: A perfect cap removal with little damage to the “spoon meat”.

Monday, August 27, 2012

High Note Trail Hike - Whistler B.C.

Panorama from Flute SummitPanorama from Flute Summit
We were in Whistler, B.C. for zip lining (with Ziprek) on Saturday and planned a nice hike for Sunday: the High Note Trail Hike. You take the Whistler Village Gondola to the Peak Express Chair to get to Whistler Summit. You have arrived at the right spot when you see an big stone man, an Inuksuk marker, "Ilanaaq", the mascot logo of the 2010 Winter Olympics. From there follow the signs or the map that is readily available everywhere you look (a piece of it is shown here).

The High Note Trail is marked as #5 and comes in at about 9.4 km. This loop trail starts at the Peak Express chairlift and ends at the Roundhouse Lodge, lower than you started. From the Roundhouse Lodge, you can go back down or take the Peak 2 Peak Gondola across to Blackcomb.

In terms of plants and animals, we saw many alpine flowers and two big hoary marmots (Marmota caligata) munching away on them, lupine to be exact. Whistler Mountain gets its name from the piercing whistle the marmots make when they detect danger. The etymology of the generic name derives from Middle French word for mountain. “The etymology of the specific epithet is derived from caligatus (L), booted, a reference to the black or blackish brown feet (Brown 1956).” according to the Alaska Geographic site.

An Inuksuk marker, "Ilanaaq", the mascot logo of the 2010 Winter Olympics, located on Whistler Mountain (left) and View of Cheakamus Lake from the High Note Trail (right)
IlanaaqCheakamus Lake

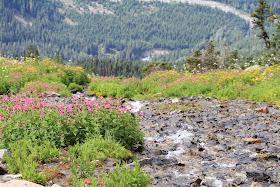
Partridgefoot - Luetkea pectinata (left) and Stream and Pink Monkey Flowers - Mimulus lewsii (right)
Partridgefoot - Luetkea pectinataStream and monkey flowers

Western Pasque Flower - Anemone occidentalis (left) and Alpine Fireweed - Epilobium latifolium (right)
Western Pasque Flowers - Anemone occidentalis

Hoary Marmot - Marmota caligata
Marmota caligataMarmota caligata 

Arrowleaf Groundsel - Senecio triangularis (left) and Orange Agoseris - Agoseris aurantiaca (right)
Mountain Arnica Orange Agoseris (Agoseris aurantiaca)

Symphony Lake (left) and Leatherleaf Saxifrage - Leptarrhena pyrolifolia (right)
Symphony LakeLeptarrhena pyrolifolia (Leatherleaft Saxifrage)

Sickletop Lousewort - Peducularis racemosa (left) and Whistler High Note Trail Map (right)
Sickletop Lousewort (Peducularis racemosa)whistler-mountain-map

Sunday, August 19, 2012

Binomen Art - Cocos

Cocos Spelled Out Using Coconut Meat (left) and Cutting Board with Coconut Open and Coconut Water (right)
Cocos Spelled Out Using Coconut Meat Cutting Board with Coconut Open and Coconut Water

One day out of the blue we tried a young coconut and we were hooked. For six months now we’ve purchased and enjoyed a couple of coconuts a week. From an average young coconut we’ve typically gotten about 1 to 2 cups of coconut water. Not that weak stuff that is all the rage today, but real thick, tasty stuff. Then there is the meat. It's a perfect snack (at least for one half of Travelmarx). So it’s only natural that we would figure out how to feature the generic name Cocos with the food. The specific epithet nucifera was a bit too long to spell out.

In the process of preparing this post, we learned several things. First, we were opening the coconut (really the bottom of the coconut) the hard way. There are many videos showing the-whack-it-once and twist and off comes the cap. In the pictures here, we removed a large part of the coconut and there are ragged edges. Not so smooth. Oh well. There is the entertaining coconut-themed site Cooky Coconuts that has a lot of backstory about the coconut.

Second, we were removing the plastic wrap surrounding the young coconut, and most people suggest keeping it on while cutting. The The Commercial Storage of Fruits, Vegetables, and Florist and Nursery Stocks (see coconut section) says that commercially sold coconuts (all?) are dipped in 1 to 3% sodium meta-bisulfite for 2 to 5 minutes before wrapping. Sometimes fungicide is used. So to avoid possibly mashing any chemicals into your cutting board, keep the plastic on.

Third, why are they called young coconuts? Young coconuts (sometimes called young Thai coconuts because most seem to be a product of Thailand) are just immature coconuts, about 6 to 9 months old. The white part surrounding the young coconuts is called the husk (coir). The white meat inside the brown shell is endosperm or “spoon meat” because you can remove it with a spoon (though we just learned a hard spatula or ice cream scoop work nicely.) Spoon meat is what we wrote the word “cocos” with.

Fourth, coconuts are not nuts, but drupes. The “spoon meat” is solid endosperm and the liquid inside is liquid endosperm.

Finally, why are young coconuts shaped as they are when you see them at the grocery store? The ones we buy are conical at one end and flat at the other. Here are our guesses: 1) They are shaped this way for shipping considerations. When shipping uniformity is good and some non-round shapes are easier to pack. 2) The shape is traditionally how they are presented in countries where coconuts are grown? 3) The shape helps guide buyers in terms of how to use the young coconut. Pointy end is the end you should work with and remove to get inside. 4) The shape is a branding decision, unique to different growers. There are other possible shapes like diamond or teardrop.

In the pictures shown here, the coconut meat (endosperm) is separated from a piece endocarp (hard brown part) and then carved up to spell Cocos.

According to Quattrocchi Cocos has the following origin: “Portuguese and Spanish coco ‘mask, head, ape, bugbear, monkey face,’ the three scars on the base of the shell resemble a monkey’s face.” The specific epithet nucifera means “nut bearing”. It sounds better than drupifera?

Coconuts in the Grocery Store – Young on the Left and Mature on the Right (left) and Cocos in a Shell (right)
Coconuts in the Grocery Store Cocos in a Shell

Our preparation of the young coconut. We have shaved the husk more than needed and we’ve cut the “top cap” off far down, more than is needed. Also, notice no plastic surrounding the husk. In the future, we’ll be keeping the plastic on considering the chance of chemical contamination of the cutting board. This coconut yielded about a cup and a half of coconut milk.Our preparation of the young coconut

Wednesday, August 15, 2012

Two Sedona Hikes: Devil’s Bridge and West Fork

Devil’s Bridge (left) and West Fork of Oak Creek (right)
Devil's Bridge, SedonaWest Fork of Oak Creek, Sedona
We’ve been using the book Sedona Top 10 Hikes by Denis Andres as our main guide for hikes around Sedona. Since we are still new to the hikes in the area, this book has been more than enough to get us started. Here are two hikes we did in late July 2012.

Devil’s Bridge Hike

We turned off of Dry Creek Road as instructed and on to Forest Road 152 as instructed in Sedona Top 10 Hikes, but after a minute or so decided that driving our rental car on 152 was not a good idea. So, we parked at the start of 152 (there is a little parking area with an information board) and walked the 1.3 miles to the parking lot at the trail head for “Devil’s Bridge #120”. From the trail head it is just over another mile to get to the bridge. You can spend time below the bridge looking up on it, above the bridge looking down on it, or, on the bridge (which we didn’t do). Roundtrip, it took us from 5:00 am to 7:45 am. What were we doing up so early? Our balloon ride (4:30 am pickup) got canceled and we were up anyway so the hike was one way to beat the midday heat and hike in the morning, which we almost never do. Here’s the bridge on a map.

The surrounding pinon-juniper forest is quite something to be in. While walking through it, the trees are spaced out. Looking down on it you see a sea of green (pinon) and bluish-green (juniper).

Agave parryi – Parry’s Agave or Century Plant Spike (left) and Arctostaphylos pungens – Pointleaft Manzanita (right)
Agave parryi – Parry’s Agave or Century Plant Spike Arctostaphylos pungens – Pointleaft Manzanita

Cupressus arizonica – Arizona Cypress Cones (left) and Datura wrightii – Sacred Datura (right)
Cupressus arizonica – Arizona Cypress Cones Datura wrightii – Scared Datura

View Toward Enchantment Resort over Nolina microcarpa – Beargrass (left) and Purshia mexicana - Mexican Cliffrose (right)
View Toward Enchantment Resort Purshia mexicana - Mexican Cliffrose

Views of Devil’s Bridge
View of Devil's Bridge, SedonaView of Devil's Bridge, SedonaView of Devil's Bridge, Sedona

Barks: Juniperus sp. (left and right)
Juniperus scopulorum BarkUnidentified Juniperus sp. Bark

Pinon-Juniper Forest Scene Near Devil’s Bridge (left) and View from Devil’s Bridge (right)
Pinon-Juniper Forest Scene Near Devil’s Bridge View from Devil’s Bridge

Looking Up at Devil’s Bridge (right) and Looking Over Devil’s Bridge Earl Morning as Storm Clouds Move Away (right)
Looking Up at Devil’s BridgeLooking Over Devil’s Bridge Earl Morning as Storm Clouds Move Away

Devil’s Bridge Trailhead Signage

West Fork Hike

The day after Devil’s Bridge, we hiked the West Fork. You drive out the north end of Sedona on 89A. You are driving along Oak Creek. You pass Slide Rock State Park, Encinoso Picnic Area, Junipine Resort, Junipine Resort, and Hoel’s Indian Shop before you pull into Shady Lane. After you cross the stream the first time you walk through an old orchard and then come up to the ruins of Mayhew’s Lodge. It was at one time listed on the National Register of Historic Places, but burned down in 1980. Read more on the history of the lodge here.

This is an interesting hike that we only scratched the surface on. We ambled about 1.5 miles into the creek (the West Fork of Oak Creek) and 1.5 miles back out. The official trail goes into the canyon about 3.2 miles with very little elevation gain. We did this hike late in the day and while it was warm, being in the canyon and mostly out of the sun and near water, made the hike very tolerable. Our advice: wear shoes you won’t mind getting wet because there are spots where you’ll just want to splash around and try to catch tadpoles as we did.

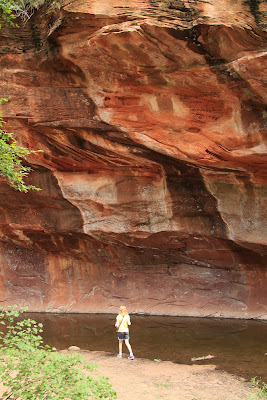
Old Orchard Near Mayhew Lodge Ruins (left) and Inside West Fork, Canyon Walls (right)
Old Orchard Near Mayhew Lodge Ruins  Inside West Fork, Canyon Walls

Exploring the West Fork (left) and Splashing Around (right)
Exploring the West Fork Exploring the West Fork

Monday, August 13, 2012

Weller Pearl and Lavandula stoechas Dried Flower Spikes

Weller Pearl and Lavandula stoechas Dried Flower SpikesWeller Pearl and Lavandula stoechas Dried Flower Spikes
Why not turn a yard chore - trimming the lavender - into something more interesting like collecting the dried flower spikes and displaying them? All of the spikes are past their prime, not a hint of purple left, just brown and green. The bees are done with them. Yet, in this is dried out state they still have a sweet, if not subdued perfume - kind of like beeswax. The spikes shown here came from three plants - all with purple-colored bracts. Other lavenders in our yard have yellow, raspberry, and white bract colors (see Lavandula Summer – Raspberry Ruffles, Madrid Blue, and Lemon Leigh).

The spikes shown here are Lavandula stoechas, called by many common names, but we prefer Spanish Lavender. It is distinctive in its appearance with “rabbit ears” on top which are really sterile bracts.

The generic name, according to our oracle Quattrocchi, has its origins as:

Latin lavo, as, lavi, lavatum, are, and lavo, is, lavi, lautum, ere “to wash”; Medieval Latin lavendula and livendula possibly connected with lividus, a, um “bluish, blue”; see Carl Linnaeus, Species Plantarum. 572. 1753 and Genera Plantarum. Ed. 5. 249. 1754.

For the specific epithet we’ll go to the Calflora.net entry for stoechadifolia where two possible etymologies are given:

stoechadifo'lia: with leaves like lavender, from Lavandula stoechas or Spanish lavender or French lavender. I have found two etymologies for the name Stoechades: (1) Stoechas was a Greek name for a plant in the mint family which grew on a group of islands off the coast of France now called the Ile de Hyeres where this species apparently grew; and (2) "The Greeks had named these islands "Stoechades", "the rows," undoubtedly because for a sailor who enters the roads they appear to form an alignment. Other archipelagoes in the Mediterranean bore names thus indicating the position of the islands. For example, Kikladhes, at Aegean Sea, laid out in a circle, Sporades (today Dodecanese) because they are scattered." (From a website about the Frioul Islands)

From the Frioul Islands (located off the Mediterranean coast of France, near Marseille) we jump to the United States, Zanesville Ohio to be exact, where the clay found there went into the two Weller Pearl pottery pieces shown here that contain the dried lavender spikes. The Pearl line features draped bead in green, rose, and black, accented with a green banded collar and punctuated by rosettes. The body of the pieces is ivory trimmed in black at the lip. The Weller Pottery Company created a wide-range of designs, from art ware to functional ware from the 1870s to the 1940s. The Pearl line was produced and sold in the late teens (~1918).

Update:  August 2013


This year, I decided to fill the bowl less and keep the little rabbit ears on.  I mixed in Lavandula stoechas ‘Lemon Leigh’ with the common purple L. stoechas.